Palo Alto Panorama Firewall
Workflow for Building Agentless Microsegmentation using Palo Alto Panorama
Onboarding
This section describes the steps required to integrate Palo Alto Panorama Firewall with the Xshield platform to enable advanced endpoint visibility and telemetry ingestion.
By connecting your Palo Alto Panorama instance to Xshield, the platform can:
- Discover firewall devices and interfaces from your Panorama instance
- Import your assets and network traffic telemetry
- Provide deep visibility and insights of the traffic flows between assets
- Generate policies and provide commands, which can be used to apply in panorama
This integration helps enhance your organization's security posture by enabling threat visibility and forensic analysis across your network without the need for any additional agents.
Prerequisites
To successfully integrate Palo Alto Panorama with Xshield, ensure the following requirements are met:
- Panorama Instance Access: You need read access to your Panorama instance to discover firewall devices and interfaces.
- SLS Configuration: Make sure Firewalls/Panorama is configured to forward log data to SLS(Stata Loggign Service).
- AWS SQS Configuration: Configure log forwarding to S3 in Strata Logging Service (SLS), create an SQS queue, and enable event notifications on the S3 bucket.
- AWS Credentials: You need AWS Access Key and Secret Key with permissions to read from the configured SQS queue.
NOTE: For logs to be available they have to enabled on policies configured on firewall. Use Log forwarding profile to upload logs to SLS and enable on policies.
Create Panorama Crediatials
- Create an user with read only access via api. https://docs.paloaltonetworks.com/pan-os/11-0/pan-os-panorama-api/get-started-with-the-pan-os-xml-api/enable-api-access
- Create an API Key. https://docs.paloaltonetworks.com/pan-os/11-0/pan-os-panorama-api/get-started-with-the-pan-os-xml-api/get-your-api-key
Setting Up Log Forwarding to AWS S3
To enable flow log ingestion, you need to configure log forwarding from SLS to AWS S3 and set up SQS notifications on creation of files.
Step 1: Configure Log Forwarding in Strata Logging Service (SLS)
Use this Link for official documentation on how to configure log forwarding in SLS https://pan.dev/cdl/docs/logforwarding/getstarted_lf/
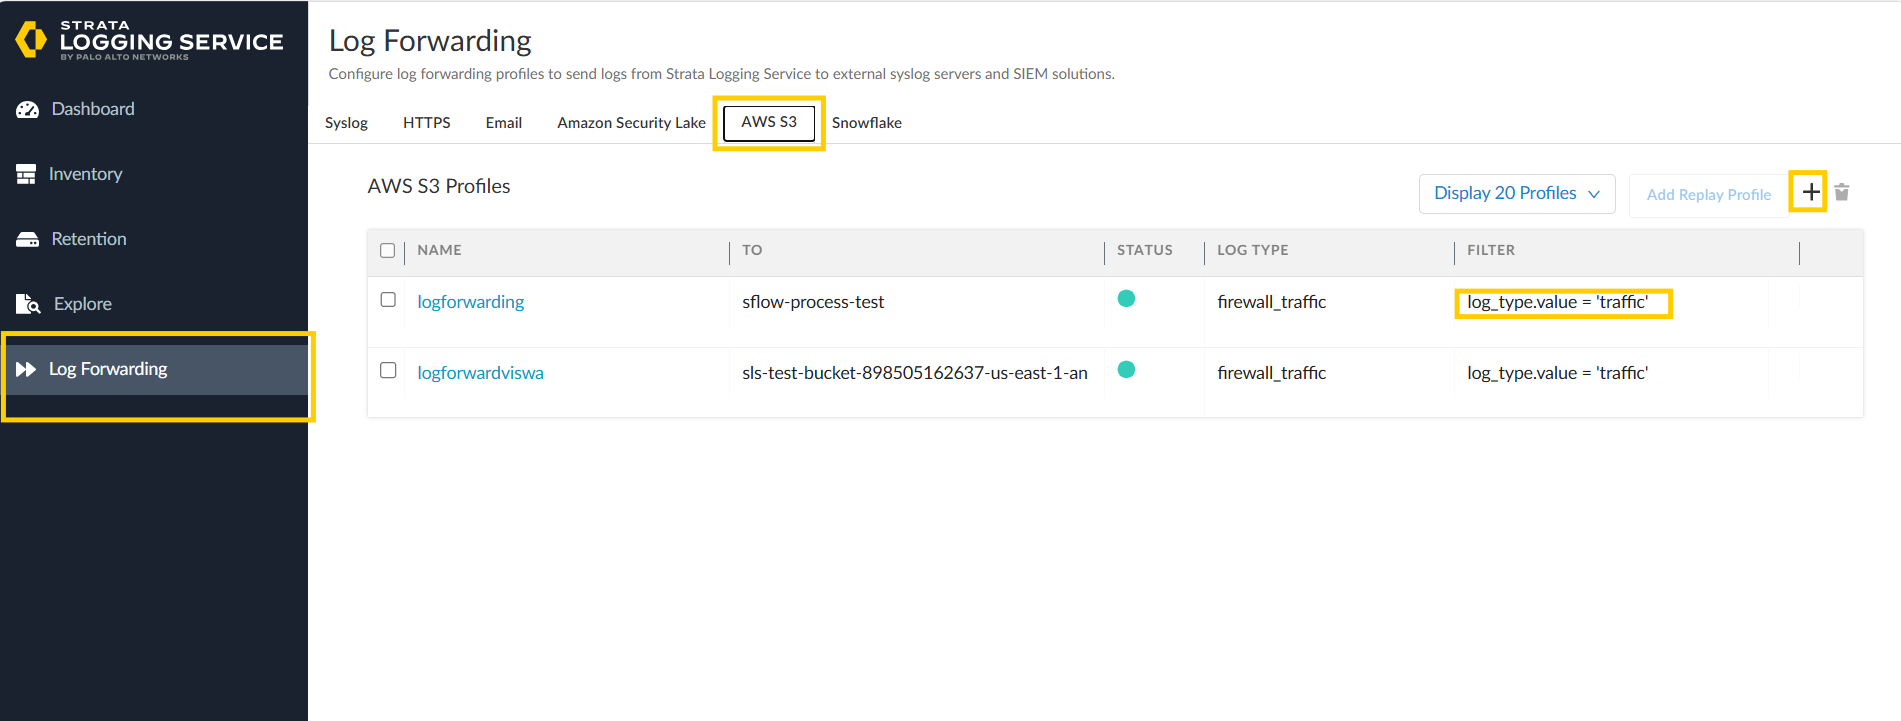
- Log in to your Strata Logging Service console.
- Navigate to Log Forwarding settings.
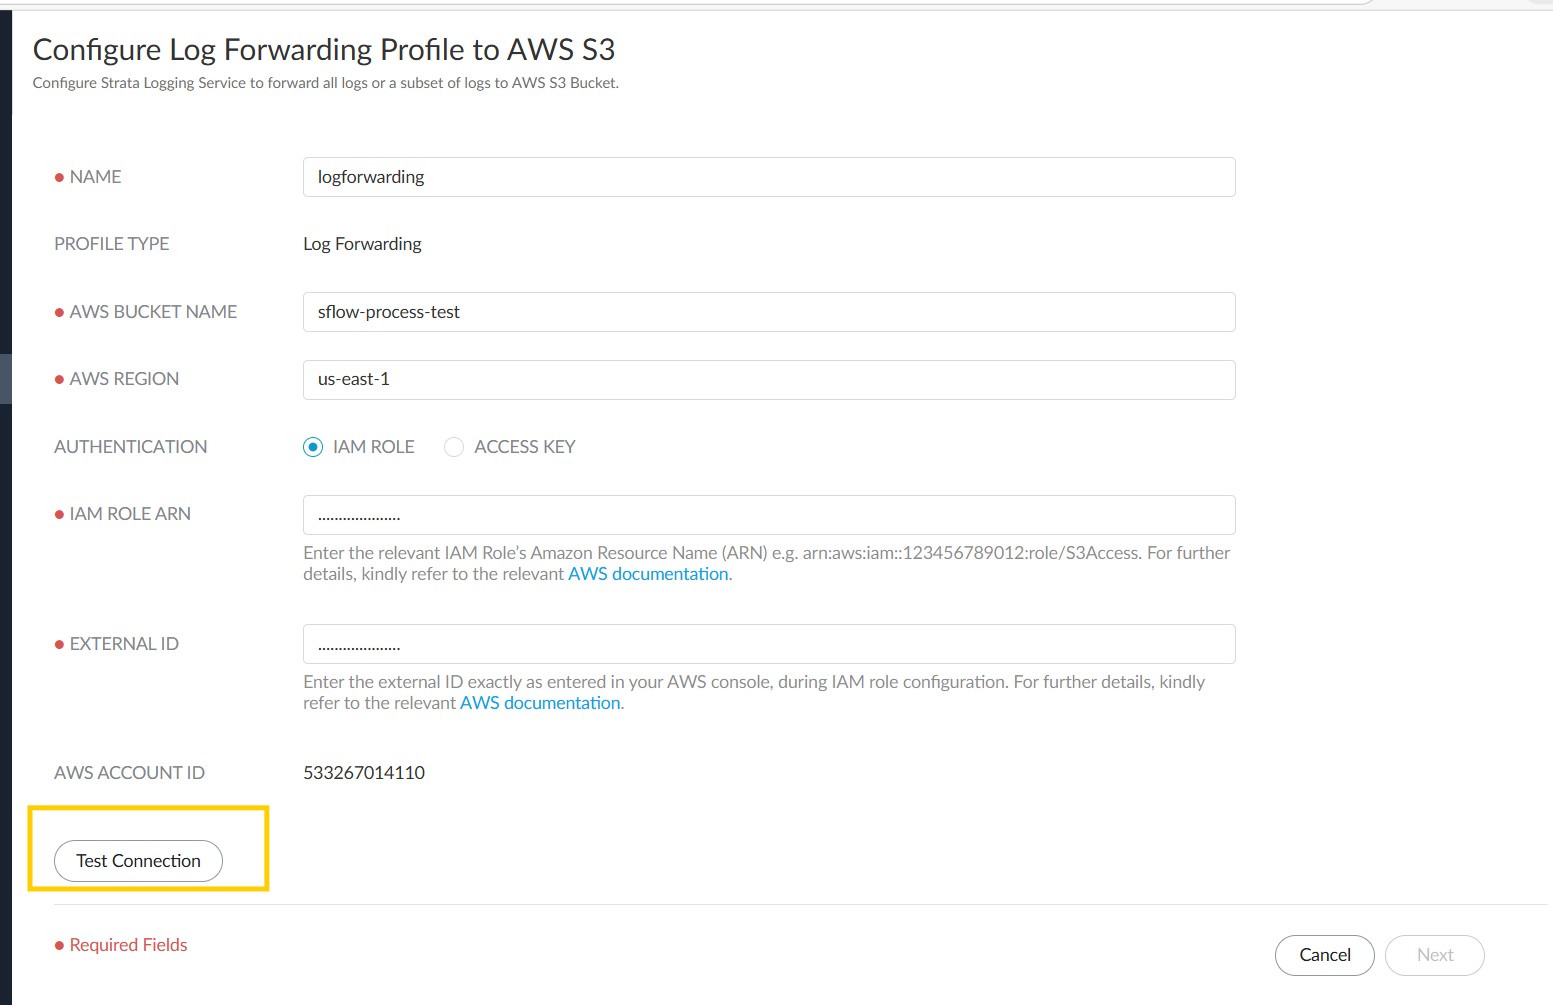
- Create a s3 bucket and iam role required to allow sls to forward files to created s3 bucket.
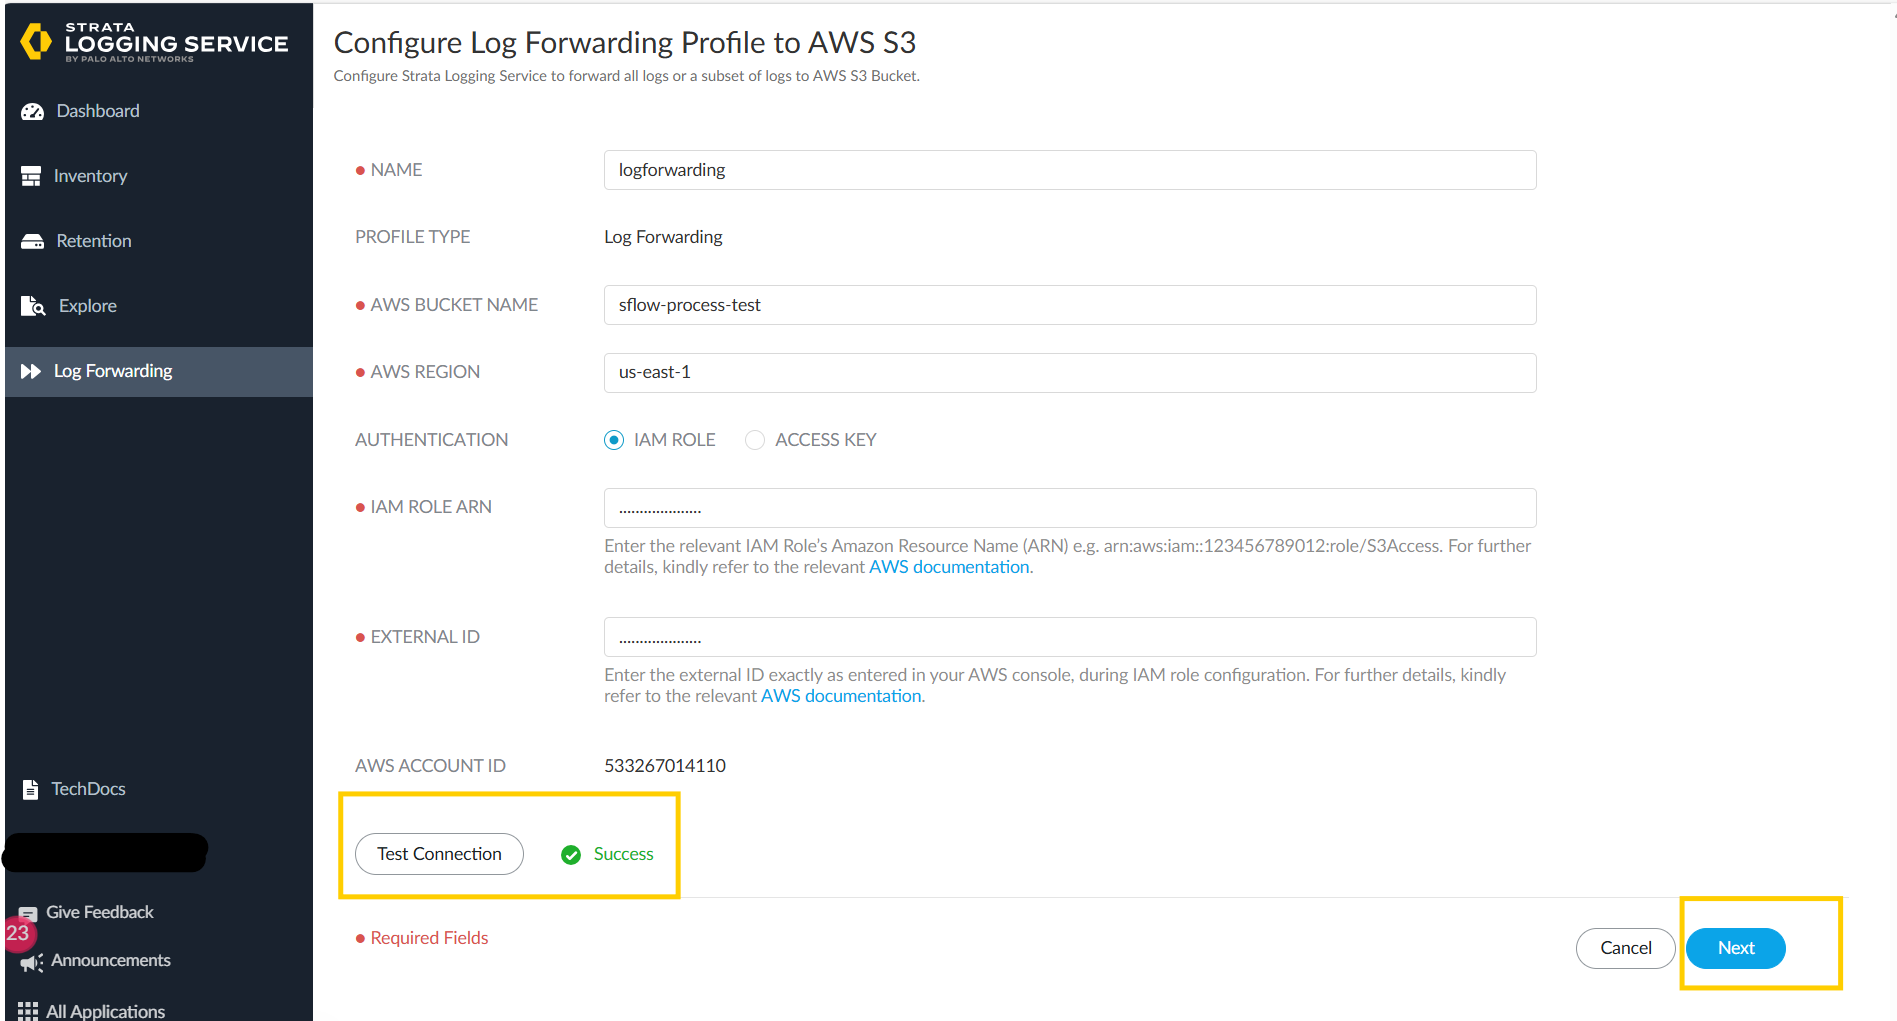
- once created and filled in details click on Test connection.
- Once it succeds and sees green tick, click on Next.
- create a filter with
log_type.value='traffic'and click on save.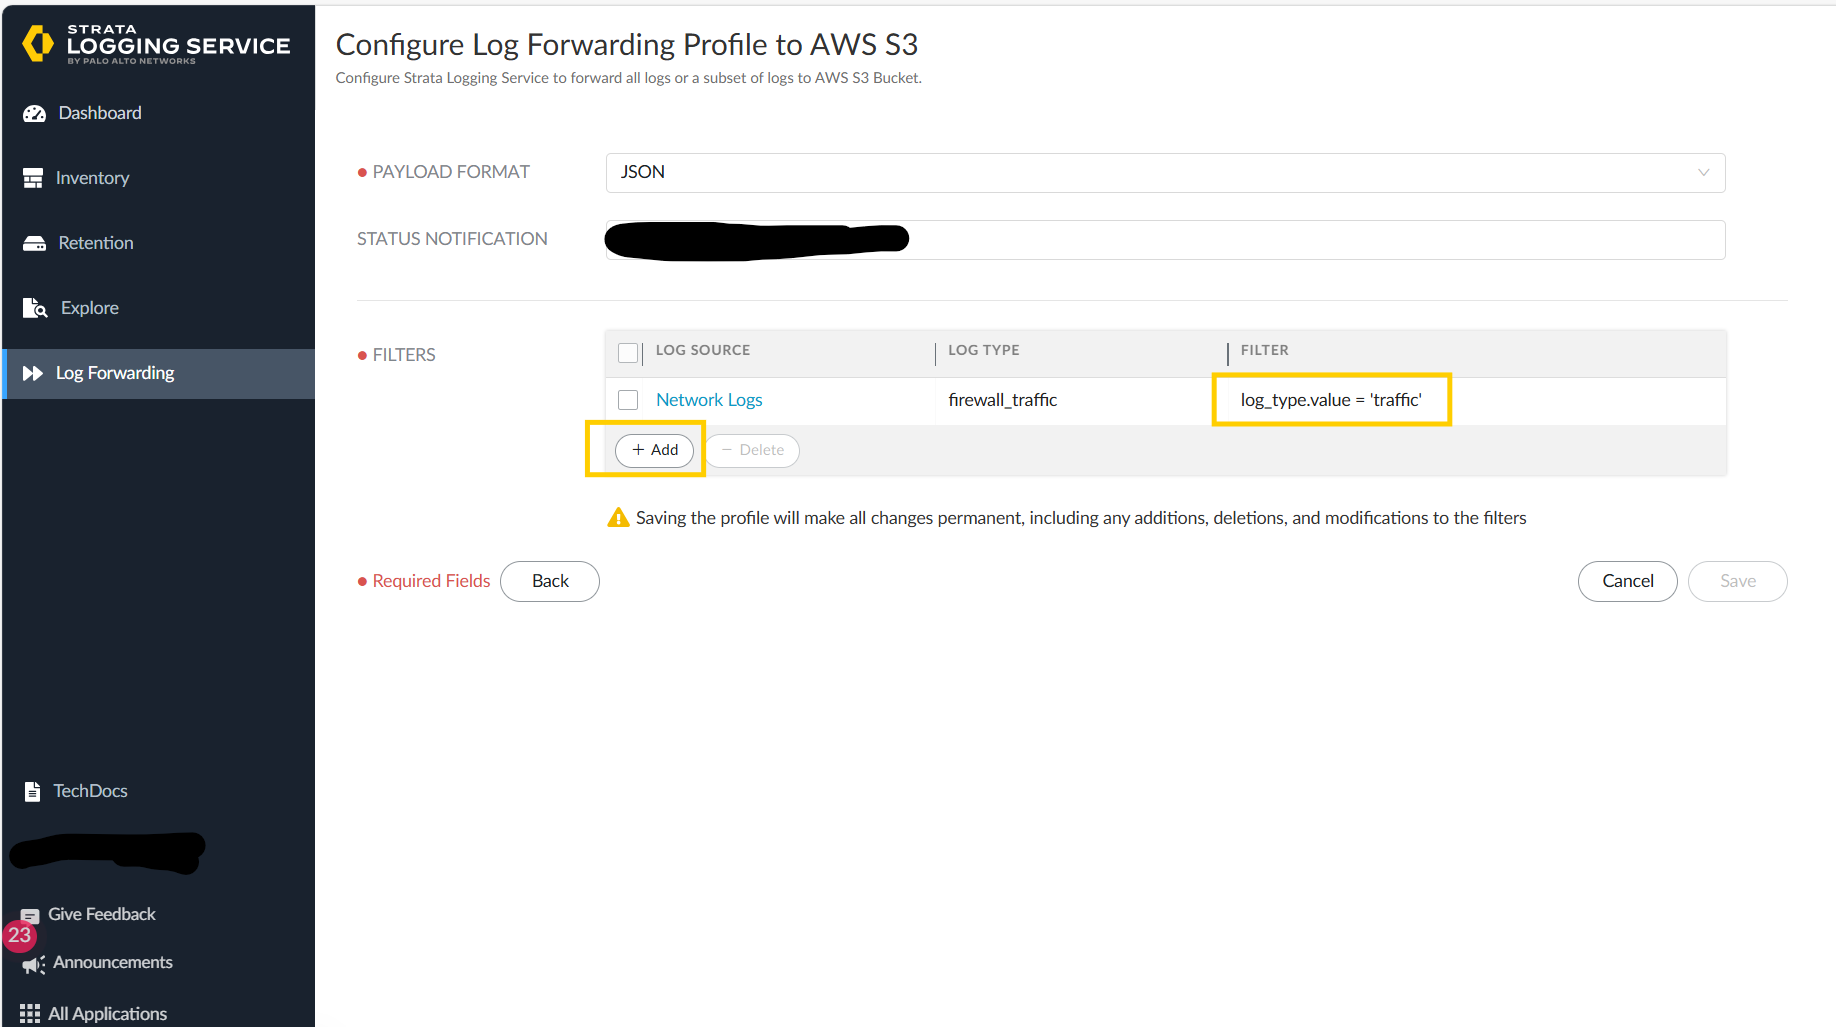
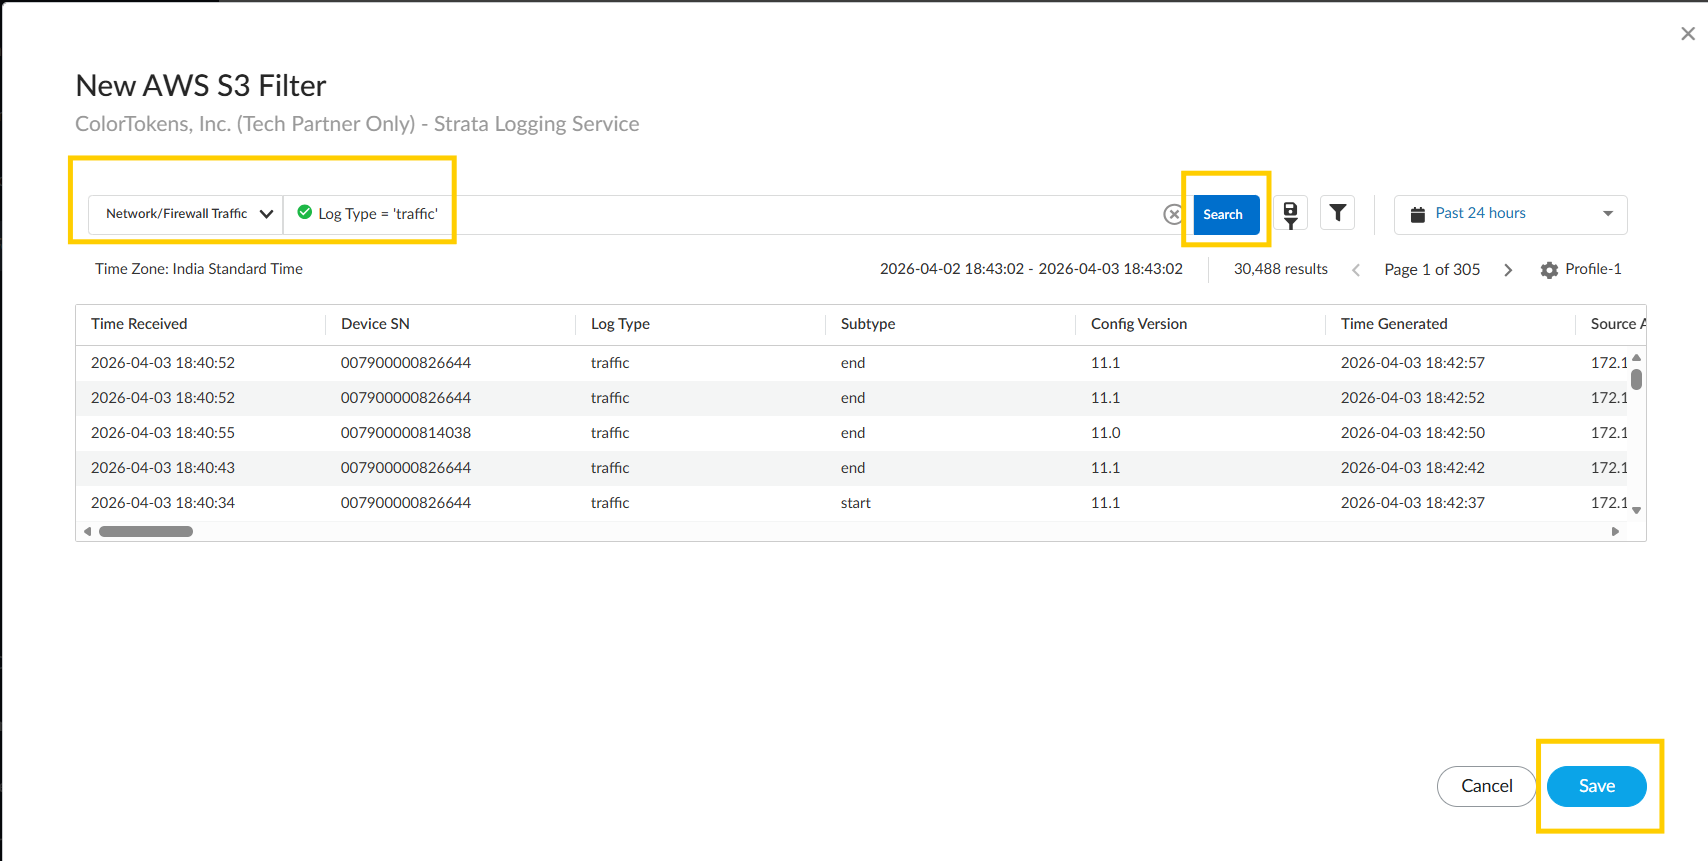
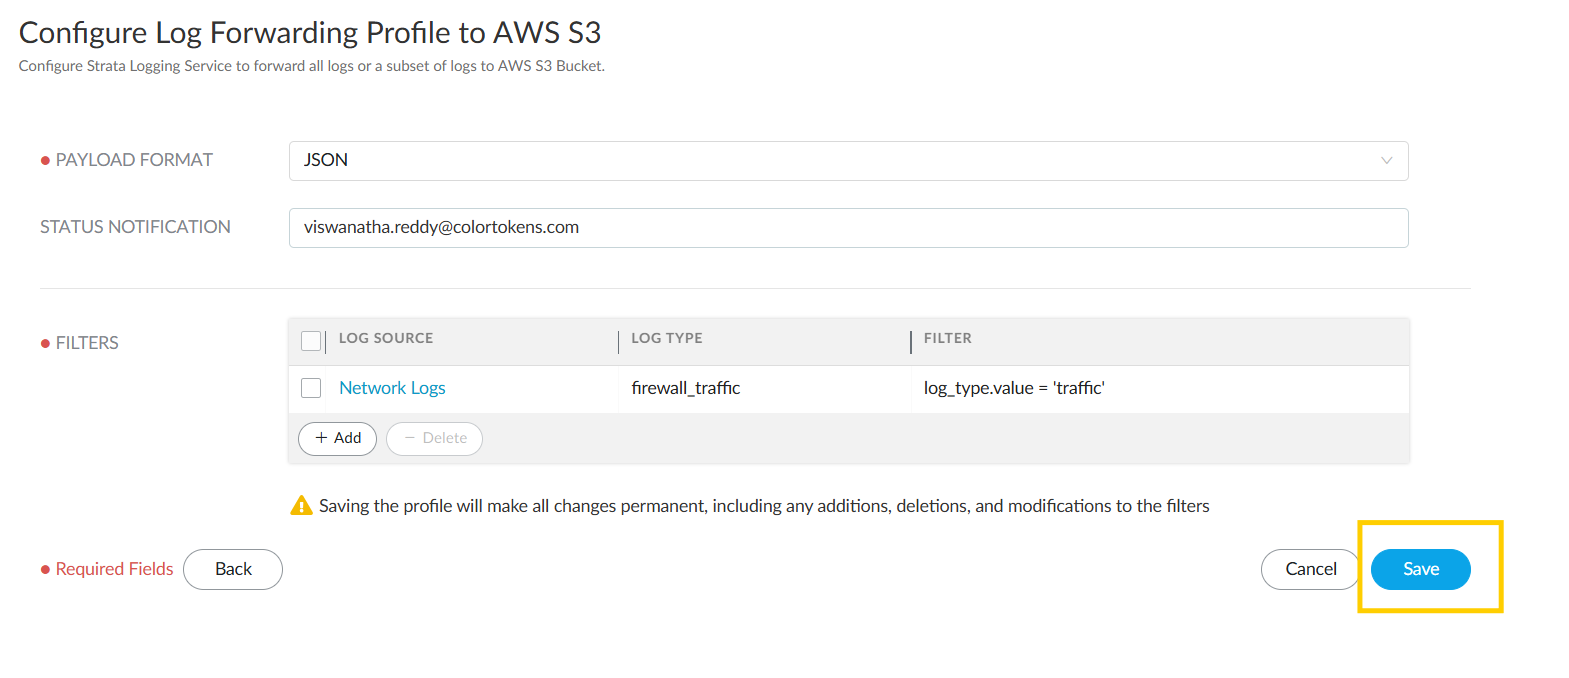
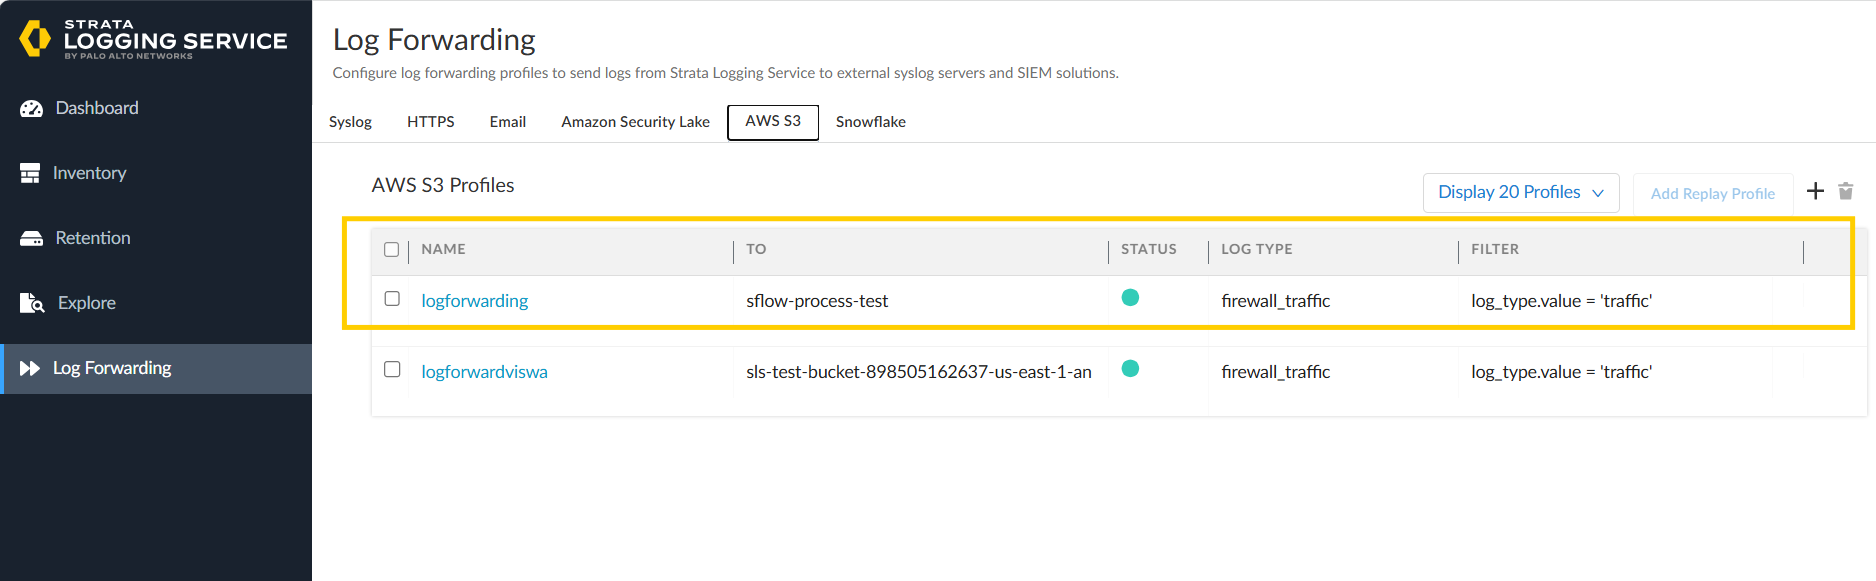
- Finally we see that log forwarding is configured.
Step 2: Create an SQS Queue
Create a standard queue. Please find the document for creating an sqs queue here, https://docs.aws.amazon.com/AWSSimpleQueueService/latest/APIReference/API_CreateQueue.html
- Log in to the AWS Management Console.
- Navigate to Amazon SQS service.
- Click Create queue and configure:
- Queue type: Standard
- Queue name: Choose a descriptive name (e.g.,
paloalto-flow-logs-queue) - Visibility timeout: 10 minutes
- Message Retention Period: 20 Minutes
- Note down the SQS Queue URL for use in Xshield configuration.
Note:If the Messages in the queue are > 5000 expect delay in seeing the paths.
Step 3: Enable S3 Event Notifications
Enable event notifcation on the S3 bucket which is used to forward logs https://docs.aws.amazon.com/AmazonS3/latest/userguide/enable-event-notifications.html
- Navigate to your S3 bucket in the AWS Console.
- Go to Properties > Event notifications.
- Click Create event notification.
- Configure:
- Event types: Select
All object create events - Destination: Choose SQS queue and select your created queue
- Config params: create a notification for all types of file creation.
- Event types: Select
- Save the configuration.
Step 4: Create AWS Credentials
Create an User with below permissions:
- To read the files the s3 bucket where files are log forwarded.
- To read the messages in provided queue.
- To delete the messages from provided queue.
example of permissions:
{
  "Version": "2012-10-17",
  "Statement": [
    {
      "Effect": "Allow",
      "Action": [
        "sqs:ReceiveMessage",
        "sqs:DeleteMessage",
        "sqs:GetQueueAttributes"
      ],
      "Resource": "arn:aws:sqs:REGION:ACCOUNT_ID:QUEUE_NAME"
    },
    {
      "Effect": "Allow",
      "Action": [
        "s3:Get*"
      ],
      "Resource": "arn:aws:s3:::BUCKET_NAME/*"
    }
  ]
}
Configuring Palo Alto Panorama Integration in Xshield Platform
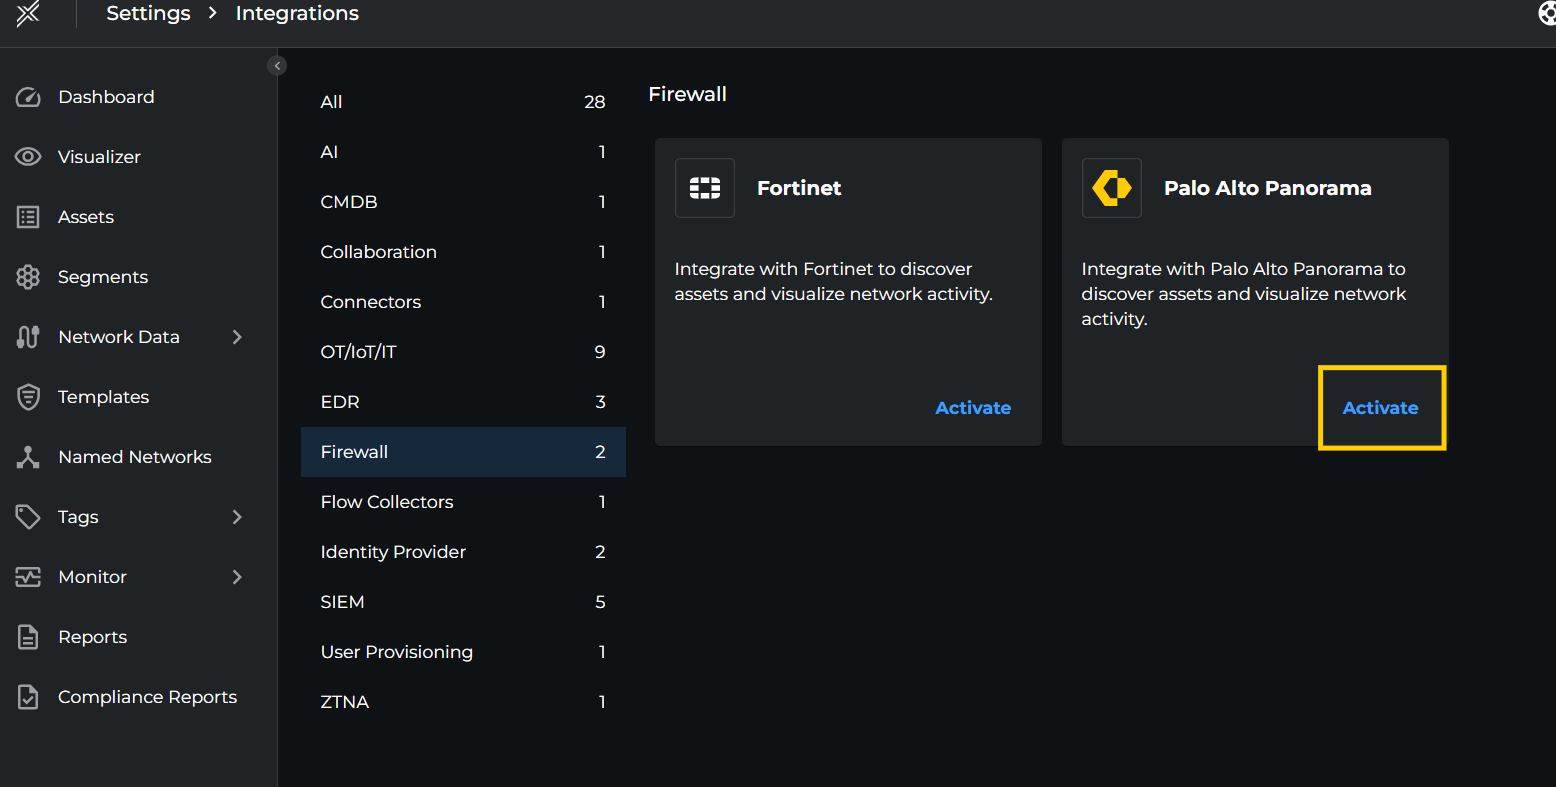
- Login to Xshield console and navigate to Settings > Integrations > Firewall > Palo Alto Panorama. Click on Activate button.
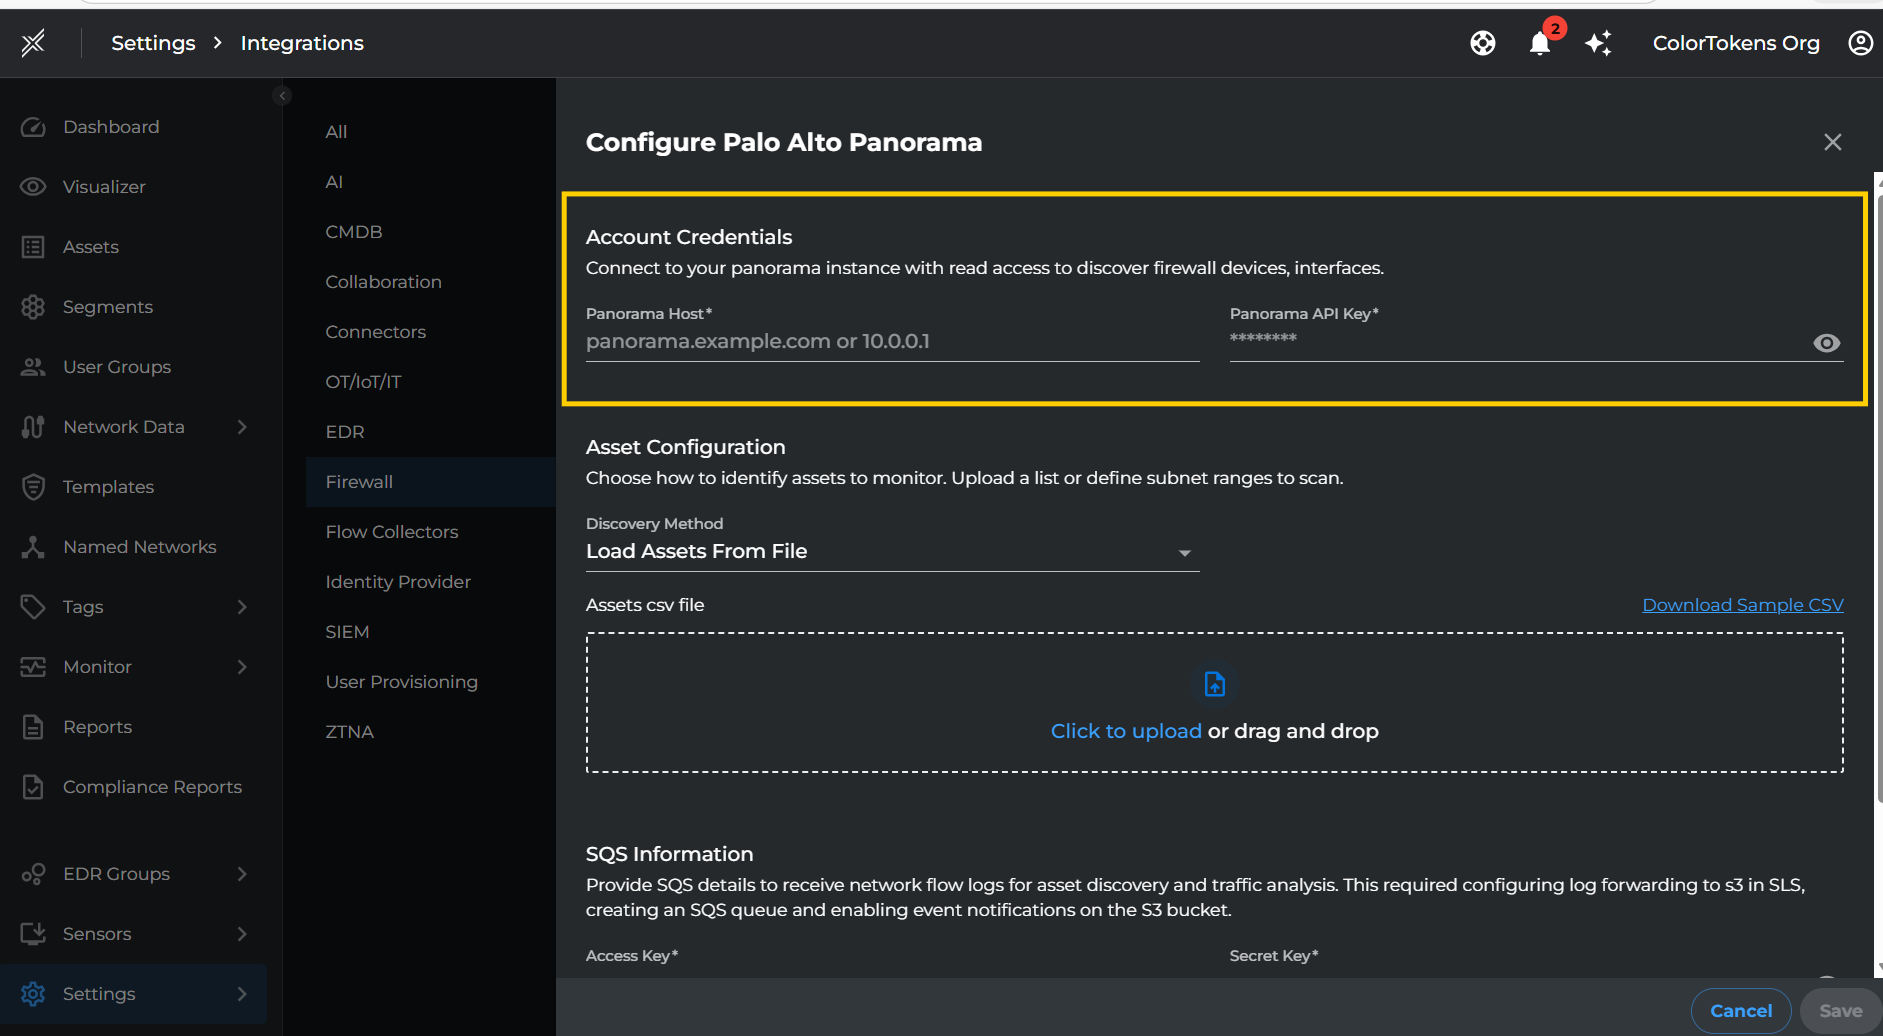
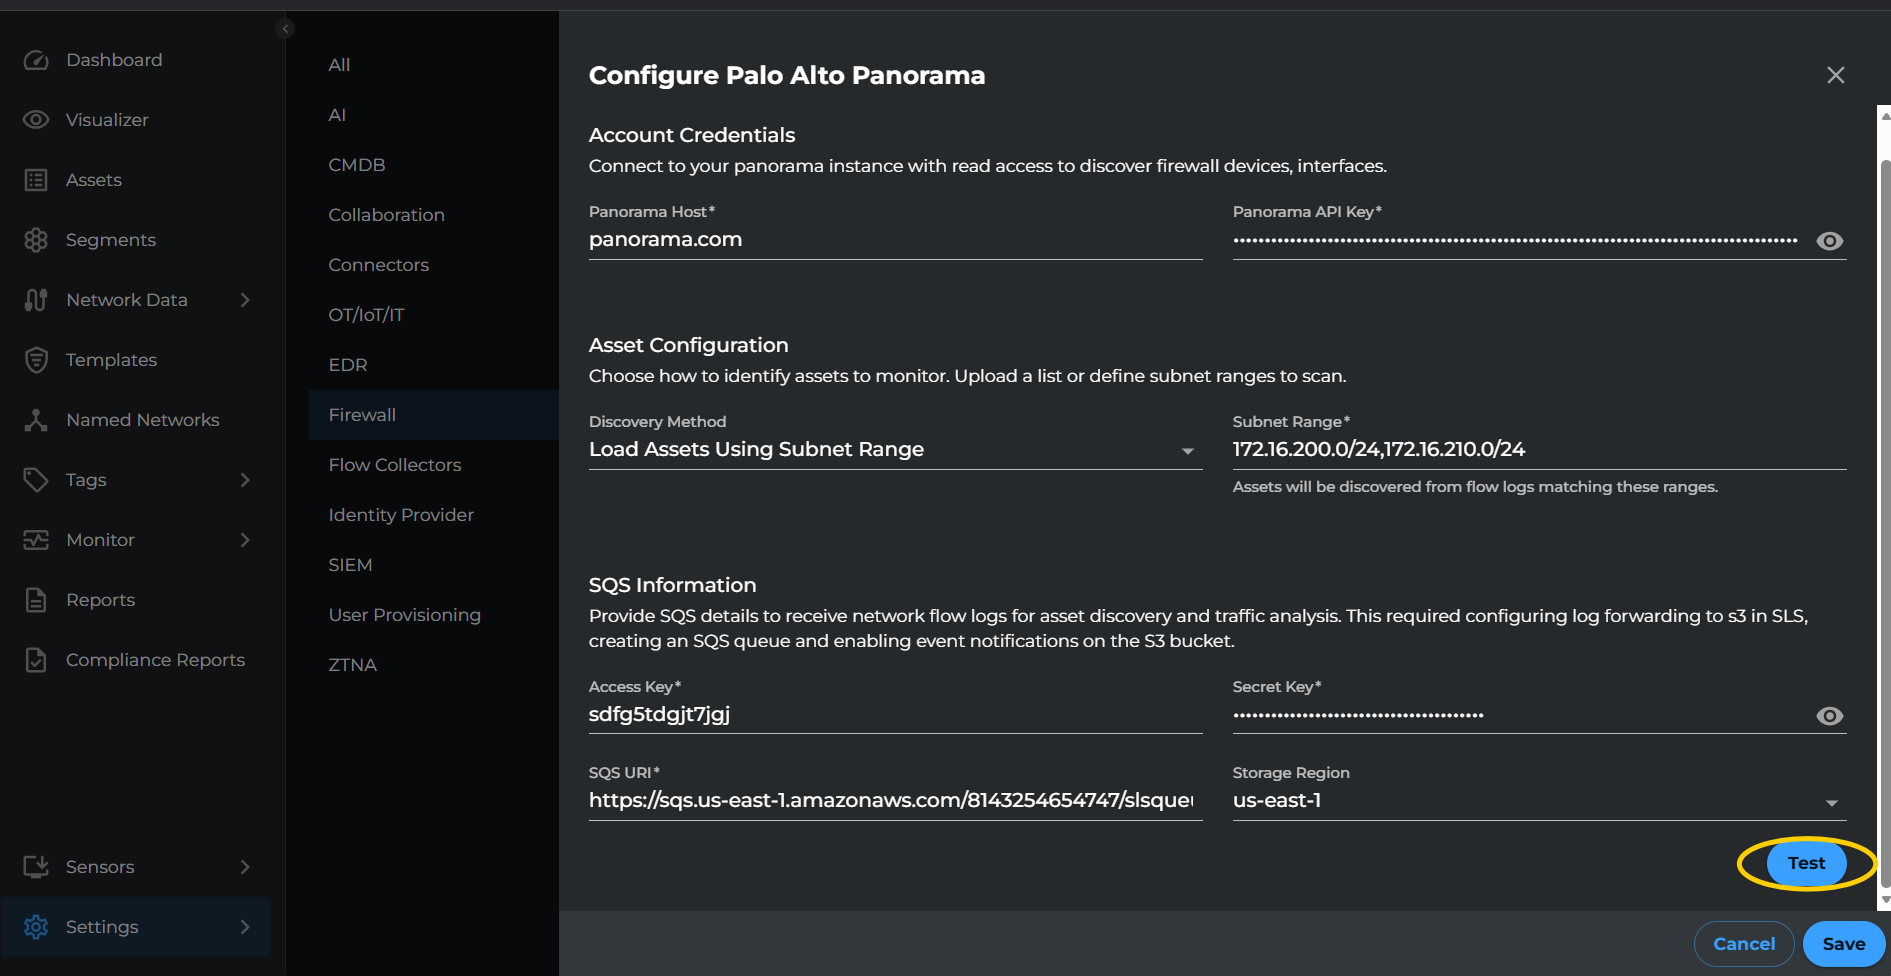
Account Credentials
Fill in the account credentials to connect to your Panorama instance.
| Setting | Description |
|---|---|
| Panorama Host | The hostname or IP address of your Panorama instance (e.g., panorama.example.com or 10.0.0.1) |
| Panorama API Key | The API key generated from your Panorama instance for authentication |
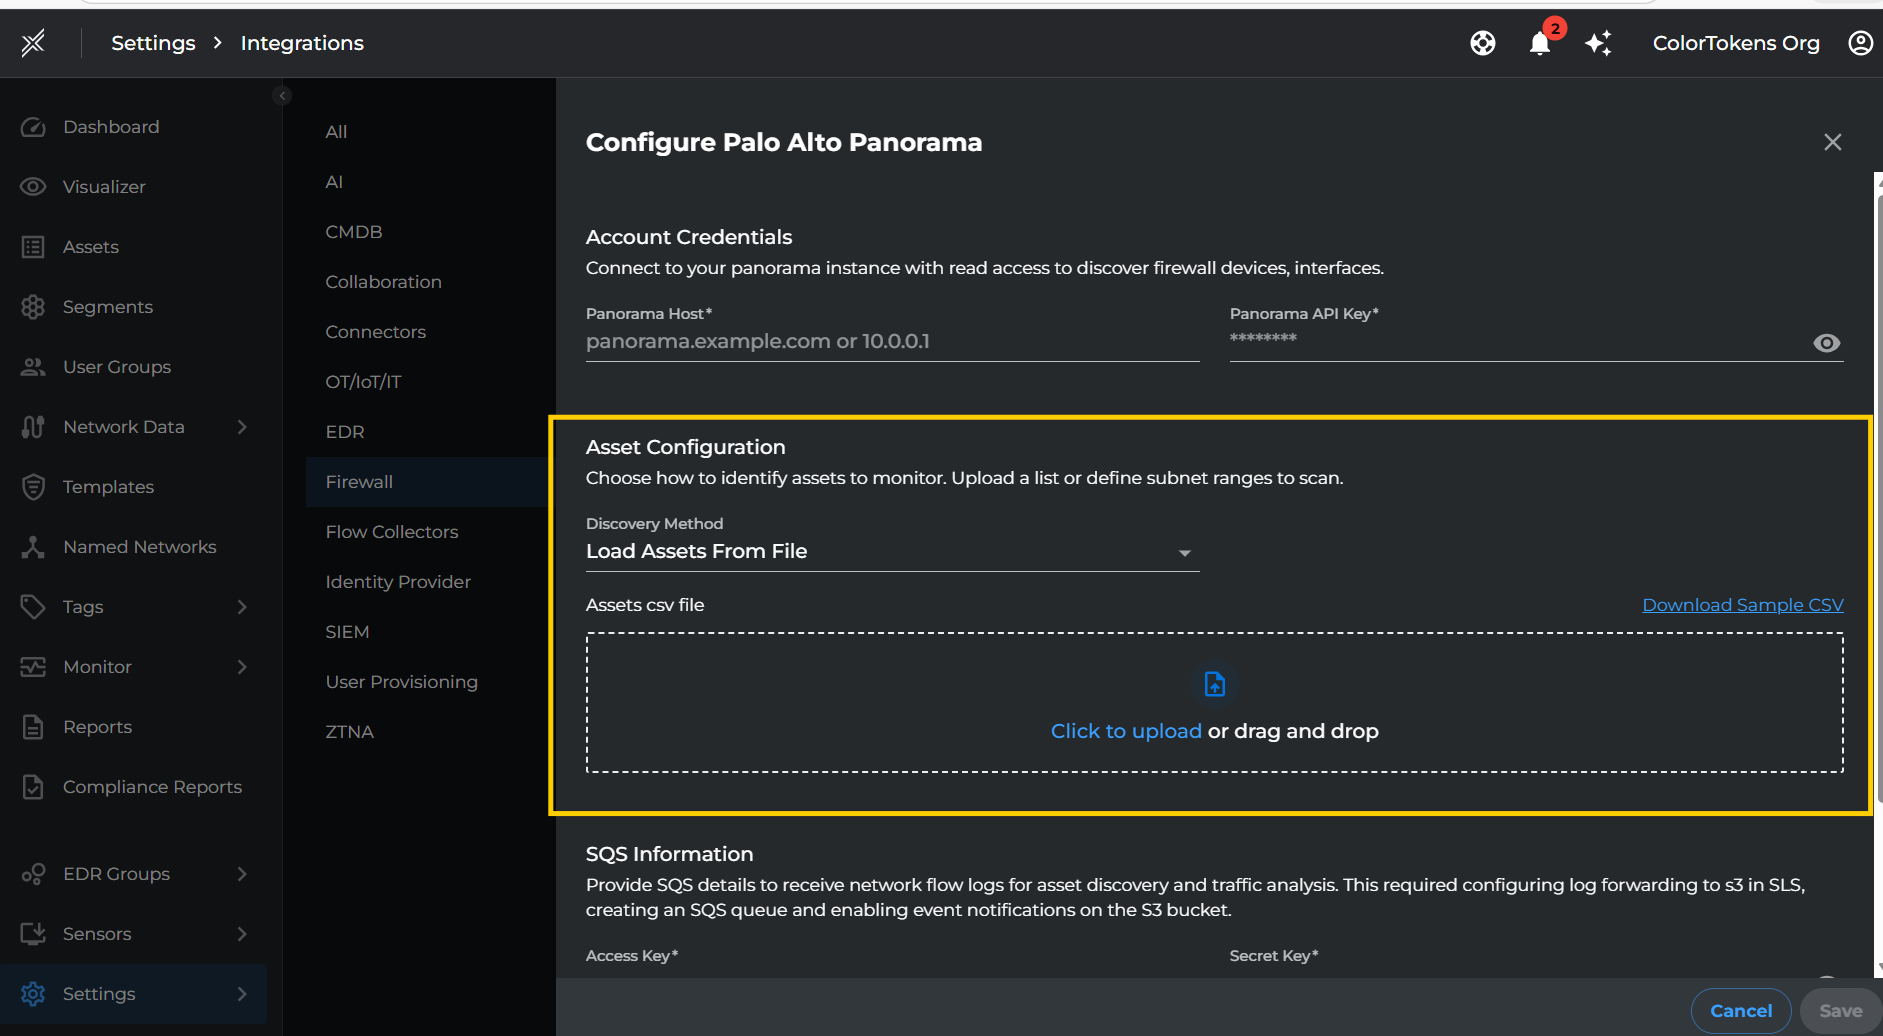
Asset Configuration
Choose how to identify assets to monitor. You can either upload a list of assets or define subnet ranges to scan.
| Setting | Description |
|---|---|
| Discovery Method | Select either Load Assets From File or Load Assets Using Subnet Range based on your preference |
Option 1: Load Assets From File
If you choose Load Assets From File, upload a CSV file containing your asset information.
| Setting | Description |
|---|---|
| Assets CSV File | Upload a CSV file containing asset details |
Note: Prepare a CSV file with the following format:
assetname,ipaddress,macaddress,deviceSlNo
server-01,192.168.1.10,00:1A:2B:3C:4D:5E,1152659
workstation-02,192.168.1.20,00:1A:2B:3C:4D:5F,1152660
router-01,192.168.1.1,00:1A:2B:3C:4D:60,1152660
switch-01,192.168.1.2,00:1A:2B:3C:4D:61,1152659
printer-01,192.168.1.30,00:1A:2B:3C:4D:62,1152660
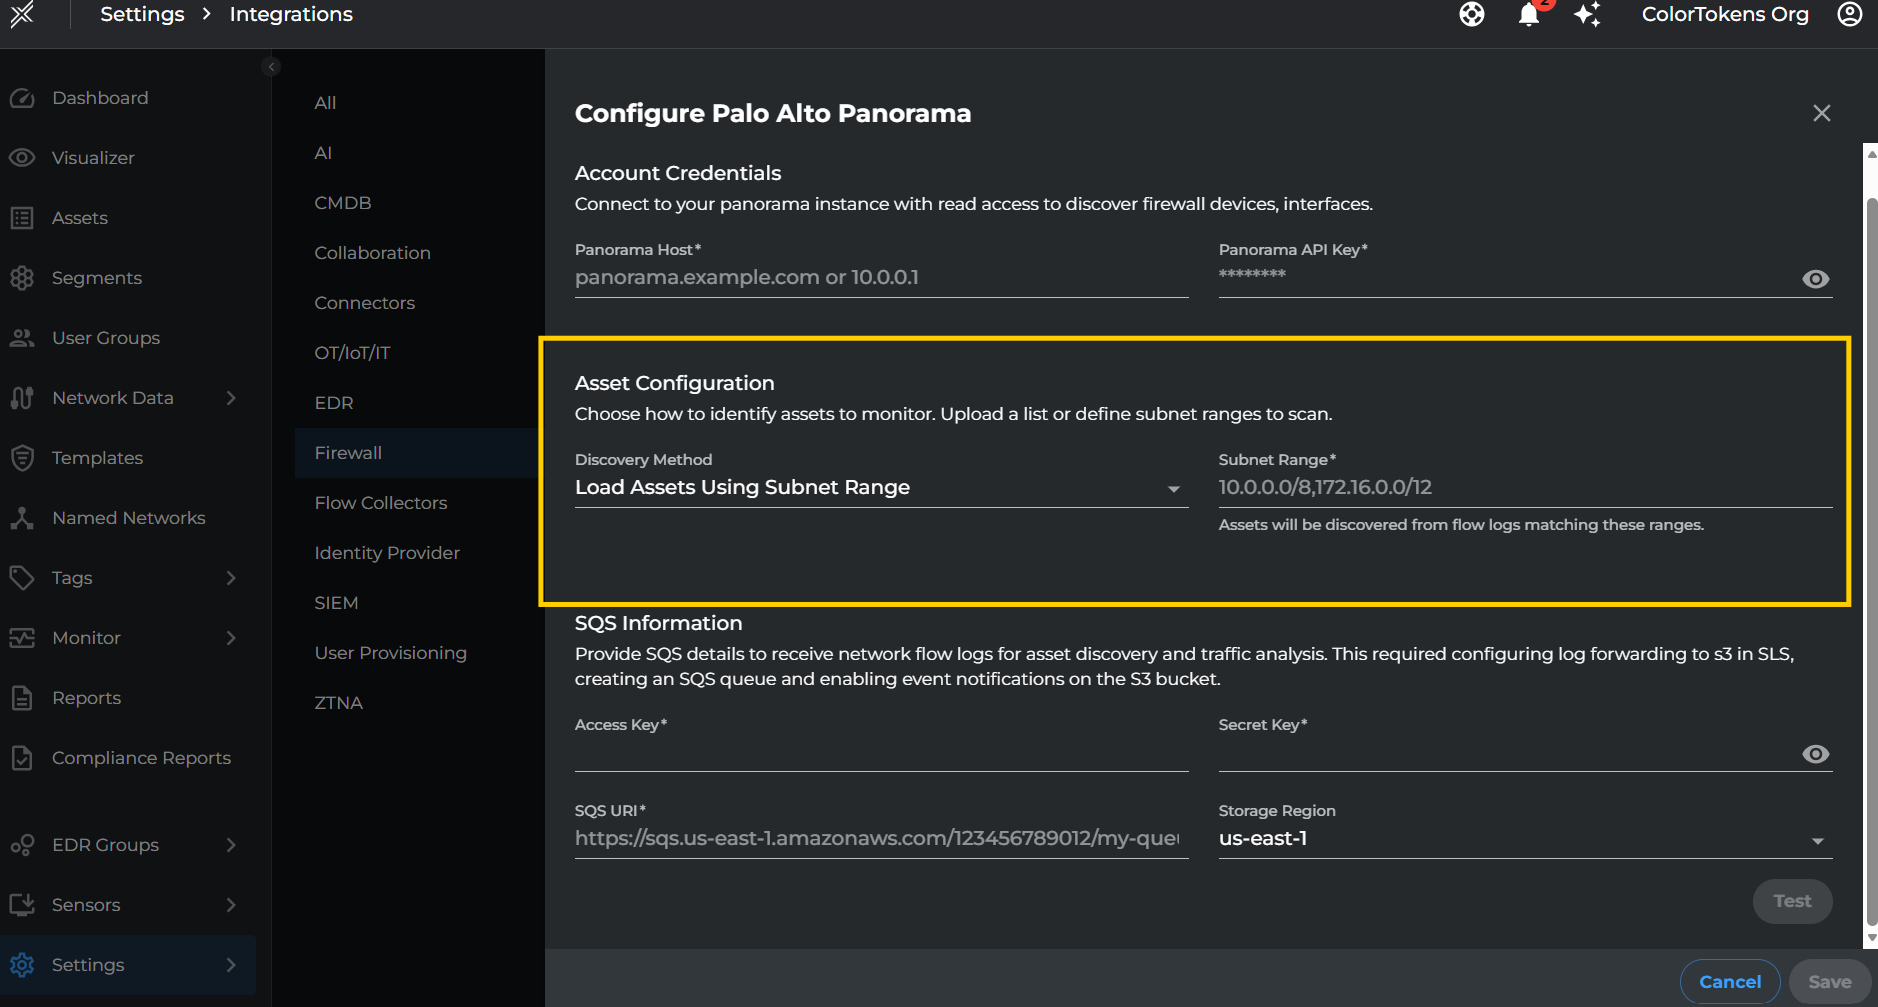
Option 2: Load Assets Using Subnet Range
If you choose Load Assets Using Subnet Range, specify the subnet ranges to discover assets from flow logs.
| Setting | Description |
|---|---|
| Subnet Range | Comma-separated list of subnet ranges in CIDR format (e.g., 10.0.0.0/8,172.16.0.0/12) |
Note: Assets will be discovered from flow logs matching these ranges.
SQS Information
Provide SQS details to receive network flow logs for asset discovery and traffic analysis. This requires configuring log forwarding to S3 in SLS, creating an SQS queue, and enabling event notifications on the S3 bucket.
| Setting | Description |
|---|---|
| Access Key | AWS Access Key ID with permissions to read from the SQS queue |
| Secret Key | AWS Secret Access Key associated with the Access Key |
| SQS URI | The full SQS queue URL (e.g., https://sqs.us-east-1.amazonaws.com/123456789012/my-queue) |
| Storage Region | AWS region where your S3 bucket and SQS queue are located |
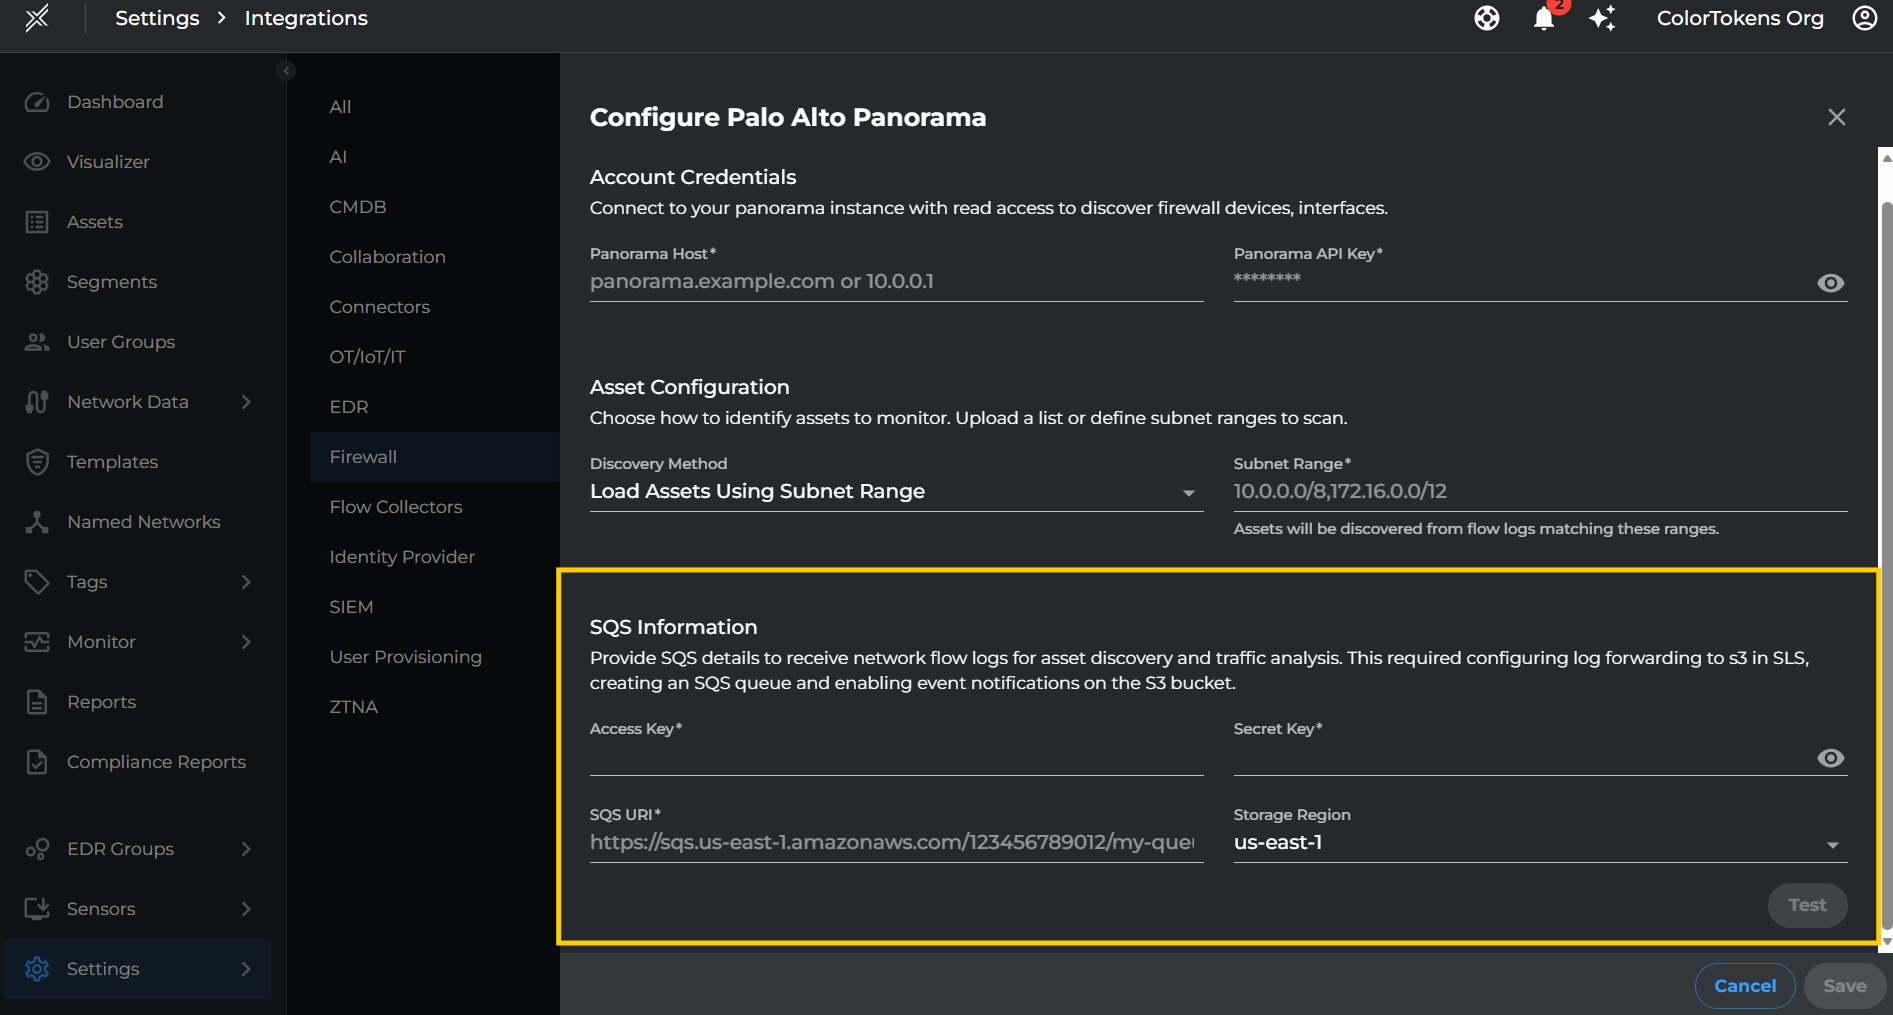
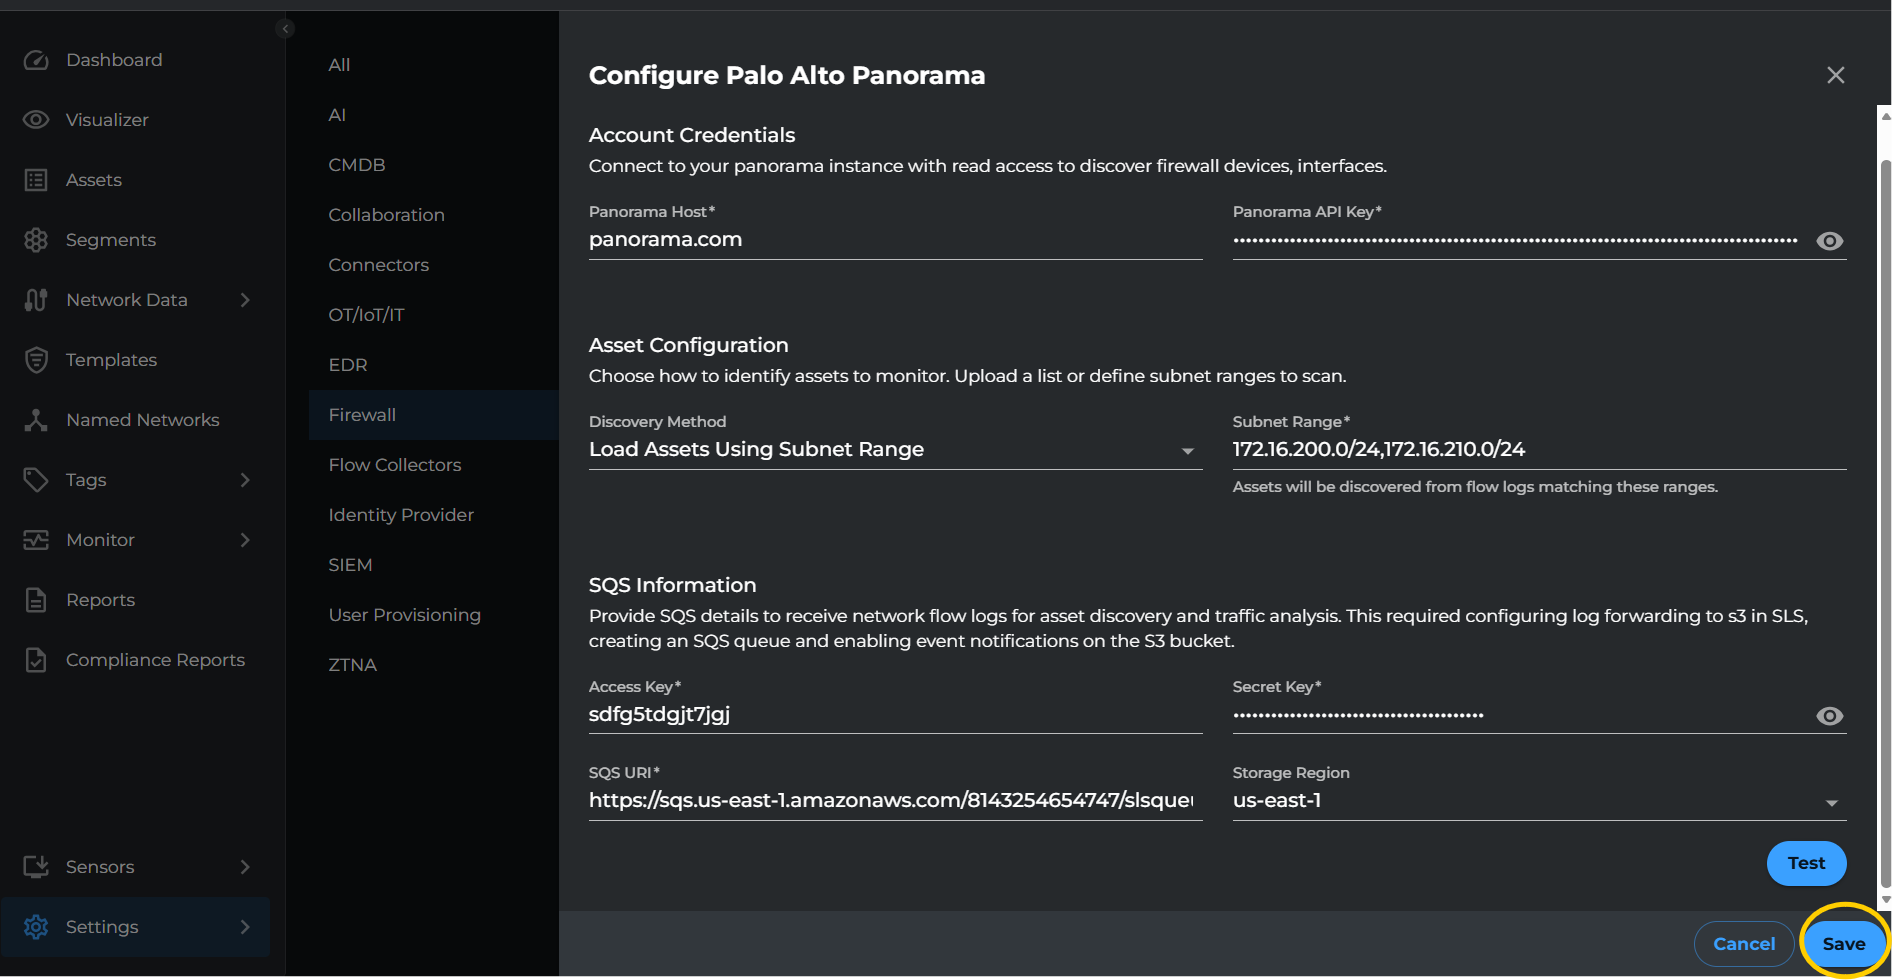
- After filling all the required details, click Test to Verify if the provided credentials are working and xshield is able to connect to services.
- After filling all the required details, click Save to complete the integration setup.
Visibility
-
To visualize the traffic flows between the imported assets, click on the Visualiser tab and the telemetry can be visualized based on the available filters.
-
Assets discovered through the integration will appear in the Assets tab with their associated IP addresses, MAC addresses, and device information.
Summary
This integration helps enhance your organization's security posture by enabling visibility and threat analysis across your Palo Alto Panorama managed network without the need for any additional agents. By leveraging flow logs forwarded through AWS SQS, Xshield provides comprehensive traffic analysis and asset discovery capabilities.