Manual (Console-based)
Introduction
This guide walks you through the manual (console-based) onboarding flow for connecting an AWS account to the Xshield Cloud Connector. You perform the steps directly in the AWS Console and the Xshield portal—no script is run in your environment.
Use this method when:
-
You prefer to deploy the CloudFormation stack yourself in the AWS Console for full control and auditability
-
You want to skip the template and create the IAM role and permissions yourself, step by step, in the AWS Console
-
Your change-management or compliance process requires manual, documented steps
-
You need to align with existing AWS governance (e.g. stack naming, parameter review)
Who Does What
Manual (console-based) onboarding is done per AWS account by someone who has access to both AWS and Xshield:
| Who | What | Why |
|---|---|---|
| AWS account admin (or IAM principal with the required CloudFormation and IAM permissions) | Either deploy the CloudFormation stack from Xshield or create the cross-account IAM role and attach policies manually in the AWS Console (see Choose your path below) | The cross-account role and permissions allow Xshield to discover and monitor resources in your account; only someone with sufficient AWS permissions can create them. |
| Xshield user (with access to Cloud Connector) | Enter Account Name and Account ID in the Xshield portal, then Verify and Connect | Xshield uses this to associate the account with your tenant and complete the connection; verification confirms that ColorTokens can assume the cross-account role in your account (same for both paths). |
The same person can do both if they have access to AWS and Xshield; otherwise, the AWS admin completes the AWS steps and shares the Account ID, and a Xshield user completes the connection in the portal.
Prerequisites
Before you begin, ensure you have:
-
Active AWS account with the permissions required for the option you choose (see Choose your path below)
-
AWS Account ID for the account you want to onboard (find it in the AWS Console—account dropdown or Support center)
-
ColorTokens AWS account ID — you need the Xshield AWS Account ID for your region/site (see the table below)
-
Active Xshield account with access to the management portal
Production AWS account IDs:
| Region | Site | Xshield AWS Account ID |
|---|---|---|
| Asia Pacific (Mumbai) | bom.colortokens.com | 477784680886 |
| Europe (Frankfurt) | fra.colortokens.com | 010659611501 |
| US East (N. Virginia) | ng.colortokens.com | 918452924160 |
| Asia Pacific (Sydney) | syd.colortokens.com | 936344984566 |
If ColorTokens has provisioned a dedicated cloud environment for your organization, contact your account representative for the correct account IDs.
Step 1: Choose your path
You can complete the AWS setup in one of two ways:
-
Path A (CloudFormation template): Use the template from Xshield and create the stack in the AWS Console. The stack creates the cross-account IAM role and policies for you.
-
Path B (manual IAM): Skip the template and create the cross-account IAM role and attach policies yourself, step by step, in the AWS Console.
Both paths result in a cross-account IAM role that Xshield can assume to discover and monitor your AWS resources. After completing either path, continue with Step 3: Enter Account Details. For the full list of IAM permissions the cross-account role must have (e.g. for Terraform or other IaC), see Reference: IAM permissions for the cross-account role at the end of this guide.
Required permissions for the AWS admin�
The IAM principal (user or role) that performs the AWS steps must have the following permissions. Use the row that matches the path you chose above.
| Path | Required permissions | Why |
|---|---|---|
| Path A (CloudFormation template) | CloudFormation: CreateStack, DescribeStacks, DescribeStackEvents, DescribeStackResource, GetTemplateSummaryIAM: CreateRole, PutRolePolicy, AttachRolePolicy, GetRole, PassRole | CloudFormation creates the stack and the stack creates IAM resources (role with inline policies, trust policy) using your credentials; you need CloudFormation write and IAM permissions to create the role and policies. |
| Path B (manual IAM) | IAM: CreateRole, PutRolePolicy, AttachRolePolicy, GetRole, ListAttachedRolePolicies, ListRolePolicies, PassRoleIf attaching AWS managed policies: GetPolicy (for customer-managed) or use policies that your account can already access | You create the role and attach inline or managed policies directly in IAM; no CloudFormation actions are needed. |
The PowerUserAccess (or AdministratorAccess) AWS managed policy includes the permissions needed for Path A. For Path B, IAMFullAccess is sufficient for creating the role and attaching policies. For least privilege, create a custom policy that grants only the actions in the table above (and the specific resources your organization allows).
Step 2: Configure AWS access (Path A or Path B)
Path A: Using the CloudFormation template
Overview: What happens during and after stack creation
Before you run the steps (Step A.1 and Step A.2), here is what the template does.
During stack creation:
- ColorTokensCrossAccountAccessRole is created in your account. This IAM role has a trust policy that allows only the ColorTokens AWS account to assume it, and an inline policy with read-only access to the services needed for discovery and monitoring (EC2, S3, RDS, Lambda, X-Ray, etc.).
After stack creation:
- The stack and the cross-account role exist in your account. ColorTokens has two role ARNs and can assume it after you complete Step 3: Enter Account Details (Verify → Connect) in the Xshield portal. Verify checks whether ColorTokens can assume the role (same as Path B); Connect starts syncing your AWS resources.
Step A.1: Get the CloudFormation Template
The template defines the cross-account IAM role and policies that allow Xshield to discover, monitor your AWS resources and perform cloud compliance scans. Deploying it via CloudFormation gives you a single, auditable stack. You can review the template before creating the stack and manage it like any other stack in your account.
-
In the Xshield portal, go to Cloud Connectors → AWS → Manual onboarding.
-
Get the CloudFormation template from the Xshield portal or from the template below. Copy the full template and save it as a
.yamlfile on your computer for the next step.
CloudFormation template (copy and save as a .yaml file):
AWSTemplateFormatVersion: "2010-09-09"
Description: "ColorTokens Stack for Cloud Security"

Metadata:
  AWS::CloudFormation::Interface:
    ParameterGroups:
      - Label:
          default: "Deployment Configuration"
        Parameters:
          - IAMRoleName
          - ColorTokensAccountID
          - ColorTokensCloudSecurityServiceRole
          - ExternalId
    ParameterLabels:
      IAMRoleName:
        default: "IAM Role Name"
      ColorTokensAccountID:
        default: "ColorTokens Account ID"
      ColorTokensCloudSecurityServiceRole:
        default: "ColorTokens Service Role Name"
      ExternalId:
        default: "External ID for secure cross-account role assumption."

Parameters:
  IAMRoleName:
    Description: "IAM role created in this account to enable cross-account access for ColorTokens."
    Type: String
    Default: "ColorTokensCrossAccountAccessRole"
    MinLength: 1
    ConstraintDescription: "IAM Role Name cannot be empty."
  ColorTokensAccountID:
    Description: "ColorTokens AWS Account ID for Cloud Security."
    Type: String
    MinLength: 12
    MaxLength: 12
    AllowedPattern: "^[0-9]{12}$"
    ConstraintDescription: "Must be a valid 12-digit AWS Account ID."
  ColorTokensCloudSecurityServiceRole:
    Description: "IAM Role in ColorTokens Account that will assume role in this account for extracting security related information."
    Type: String
    Default: "ColorTokensCloudSecurityServiceRole"
    MinLength: 1
    ConstraintDescription: "ColorTokensRoleName cannot be empty."
  ExternalId:
    Description: "External ID for secure cross-account role assumption. This value must match when ColorTokens assumes the role."
    Type: String
    MinLength: 1
    ConstraintDescription: "ExternalId cannot be empty."

Resources:
  ColorTokensCrossAccountAccessRole:
    Type: "AWS::IAM::Role"
    Properties:
      RoleName: !Ref IAMRoleName
      AssumeRolePolicyDocument:
        Version: "2012-10-17"
        Statement:
          - Effect: "Allow"
            Principal:
              AWS:
                - !Sub "arn:aws:iam::${ColorTokensAccountID}:role/${ColorTokensCloudSecurityServiceRole}"
            Action: "sts:AssumeRole"
            Condition:
              StringEquals:
                sts:ExternalId: !Ref ExternalId
      Policies:
        - PolicyName: "ColorTokensAccessPolicy"
          PolicyDocument:
            Version: "2012-10-17"
            Statement:
              - Action:
                  - "s3:ListAllMyBuckets"
                  - "s3:GetBucketLocation"
                  - "s3:GetBucketAcl"
                  - "s3:GetBucketPolicy"
                  - "s3:GetBucketVersioning"
                  - "s3:GetBucketPublicAccessBlock"
                  - "s3:GetBucketNotification"
                  - "s3:GetBucketTagging"
                  - "s3:ListBucket"
                Resource: "*"
                Effect: "Allow"
                Sid: "ColorTokensS3MetadataReadAccess"
              - Action:
                  - "lambda:ListFunctions"
                  - "lambda:GetFunction"
                  - "lambda:GetFunctionConfiguration"
                  - "lambda:GetPolicy"
                  - "lambda:ListTags"
                  - "lambda:ListEventSourceMappings"
                Resource: "*"
                Effect: "Allow"
                Sid: "ColorTokensLambdaReadAccess"
              - Action:
                  - "dynamodb:ListTables"
                  - "dynamodb:DescribeTable"
                  - "dynamodb:ListTagsOfResource"
                Resource: "*"
                Effect: "Allow"
                Sid: "ColorTokensDynamoReadAccess"
              - Action:
                  - "ec2:Describe*"
                  - "elasticloadbalancing:Describe*"
                  - "rds:Describe*"
                Resource: "*"
                Effect: "Allow"
                Sid: "ColorTokensCommonReadAccess"
              - Action:
                  - "rds:List*"
                Resource: "*"
                Effect: "Allow"
                Sid: "ColorTokensRDSReadAccess"
              - Action:
                  - "apigateway:GET"
                Effect: "Allow"
                Resource: "*"
                Sid: "ColorTokensAPIGatewayReadAccess"
              - Action:
                  - "ec2:GetManagedPrefixListEntries"
                Effect: "Allow"
                Resource: "*"
                Sid: "ColorTokensPrefixListReadAccess"
              - Action:
                  - "ec2:SearchTransitGatewayMulticastGroups"
                Effect: "Allow"
                Resource: "*"
                Sid: "ColorTokensReadTransitGatewayGroup"
              - Action:
                  - "directconnect:Describe*"
                Effect: "Allow"
                Resource: "*"
                Sid: "ColorTokensDirectConnectReadAccess"
              - Action:
                  - "networkmanager:ListCoreNetworks"
                  - "networkmanager:GetCoreNetwork"
                  - "networkmanager:ListAttachments"
                  - "networkmanager:GetVpcAttachment"
                  - "networkmanager:GetSiteToSiteVpnAttachment"
                  - "networkmanager:GetConnectAttachment"
                  - "networkmanager:GetTransitGatewayRouteTableAttachment"
                  - "networkmanager:ListPeerings"
                  - "networkmanager:GetTransitGatewayPeering"
                  - "networkmanager:GetTransitGatewayRegistrations"
                Effect: "Allow"
                Resource: "*"
                Sid: "ColorTokensNetworkManagerReadAccess"
              - Action:
                  - "xray:GetTraceSummaries"
                  - "xray:BatchGetTraces"
                Effect: "Allow"
                Resource: "*"
                Sid: "ColorTokensXRayReadAccess"
        - PolicyName: "ColorTokensXCloudComplianceReadAccess"
          PolicyDocument:
            Version: "2012-10-17"
            Statement:
              - Action:
                  - "access-analyzer:ListAnalyzers"
                Effect: "Allow"
                Resource: "*"
                Sid: "XcloudAccessAnalyzerReadAccess"
              - Action:
                  - "cloudtrail:DescribeTrails"
                  - "cloudtrail:GetTrailStatus"
                  - "cloudtrail:GetEventSelectors"
                Effect: "Allow"
                Resource: "*"
                Sid: "XcloudCloudTrailReadAccess"
              - Action:
                  - "cloudwatch:DescribeAlarms"
                Effect: "Allow"
                Resource: "*"
                Sid: "XcloudCloudWatchReadAccess"
              - Action:
                  - "config:DescribeConfigurationRecorderStatus"
                  - "config:DescribeConfigurationRecorders"
                Effect: "Allow"
                Resource: "*"
                Sid: "XcloudConfigReadAccess"
              - Action:
                  - ec2:DescribeInstances
                  - ec2:DescribeSnapshots
                  - ec2:DescribeAddresses
                  - ec2:DescribeFlowLogs
                  - ec2:DescribeRegions
                  - ec2:DescribeSecurityGroups
                  - ec2:DescribeNetworkAcls
                  - ec2:DescribeNetworkInterfaces
                  - ec2:DescribeVpcs
                Effect: "Allow"
                Resource: "*"
                Sid: "XcloudEC2ReadAccess"
              - Action:
                  - "elasticloadbalancing:DescribeLoadBalancers"
                  - "elasticloadbalancing:DescribeListeners"
                  - "elasticloadbalancing:DescribeRules"
                Effect: "Allow"
                Resource: "*"
                Sid: "XcloudELBReadAccess"
              - Action:
                  - "iam:GetAccountSummary"
                  - "iam:GetCredentialReport"
                  - "iam:GetPolicyVersion"
                  - "iam:GetAccountPasswordPolicy"
                  - "iam:GenerateCredentialReport"
                  - "iam:ListAttachedUserPolicies"
                  - "iam:ListEntitiesForPolicy"
                  - "iam:ListPolicies"
                  - "iam:ListServerCertificates"
                  - "iam:ListUsers"
                  - "iam:ListUserPolicies"
                  - "iam:ListVirtualMFADevices"
                Effect: "Allow"
                Resource: "*"
                Sid: "XcloudIAMReadAccess"
              - Action:
                  - "kms:DescribeKey"
                  - "kms:GetKeyRotationStatus"
                  - "kms:ListKeys"
                Effect: "Allow"
                Resource: "*"
                Sid: "XcloudKMSReadAccess"
              - Action:
                  - "logs:DescribeMetricFilters"
                Effect: "Allow"
                Resource: "*"
                Sid: "XcloudLogsReadAccess"
              - Action:
                  - "rds:DescribeDBInstances"
                Effect: "Allow"
                Resource: "*"
                Sid: "XcloudRDSReadAccess"
              - Action:
                  - "s3:GetAccountPublicAccessBlock"
                  - "s3:GetBucketAcl"
                  - "s3:GetBucketLocation"
                  - "s3:GetBucketLogging"
                  - "s3:GetBucketPolicy"
                  - "s3:GetBucketVersioning"
                  - "s3:GetEncryptionConfiguration"
                  - "s3:GetReplicationConfiguration"
                  - "s3:ListAllMyBuckets"
                  - "s3:GetBucketPublicAccessBlock"
                Effect: "Allow"
                Resource: "*"
                Sid: "XcloudS3ReadAccess"
              - Action:
                  - "sns:ListSubscriptions"
                Effect: "Allow"
                Resource: "*"
                Sid: "XcloudSNSReadAccess"
              - Action:
                  - "sts:GetCallerIdentity"
                Effect: "Allow"
                Resource: "*"
                Sid: "XcloudSTSReadAccess"
              - Action:
                  - "account:GetAccountInformation"
                Effect: "Allow"
                Resource: "*"
                Sid: "XcloudAccountReadAccess"

Outputs:
  IAMRoleARN:
    Description: "ARN of the created IAM Role for ColorTokens cross-account access."
    Value: !GetAtt ColorTokensCrossAccountAccessRole.Arn
    Export:
      Name: "ColorTokensCrossAccountAccessRoleARN"

  ExternalId:
    Description: "External ID for secure cross-account role assumption"
    Value: !Ref ExternalId

  StackName:
    Description: "Name of the CloudFormation stack"
    Value: !Ref AWS::StackName

  AccessMode:
    Description: "Access mode - Read-Only (Discovery Only)"
    Value: "readonly"
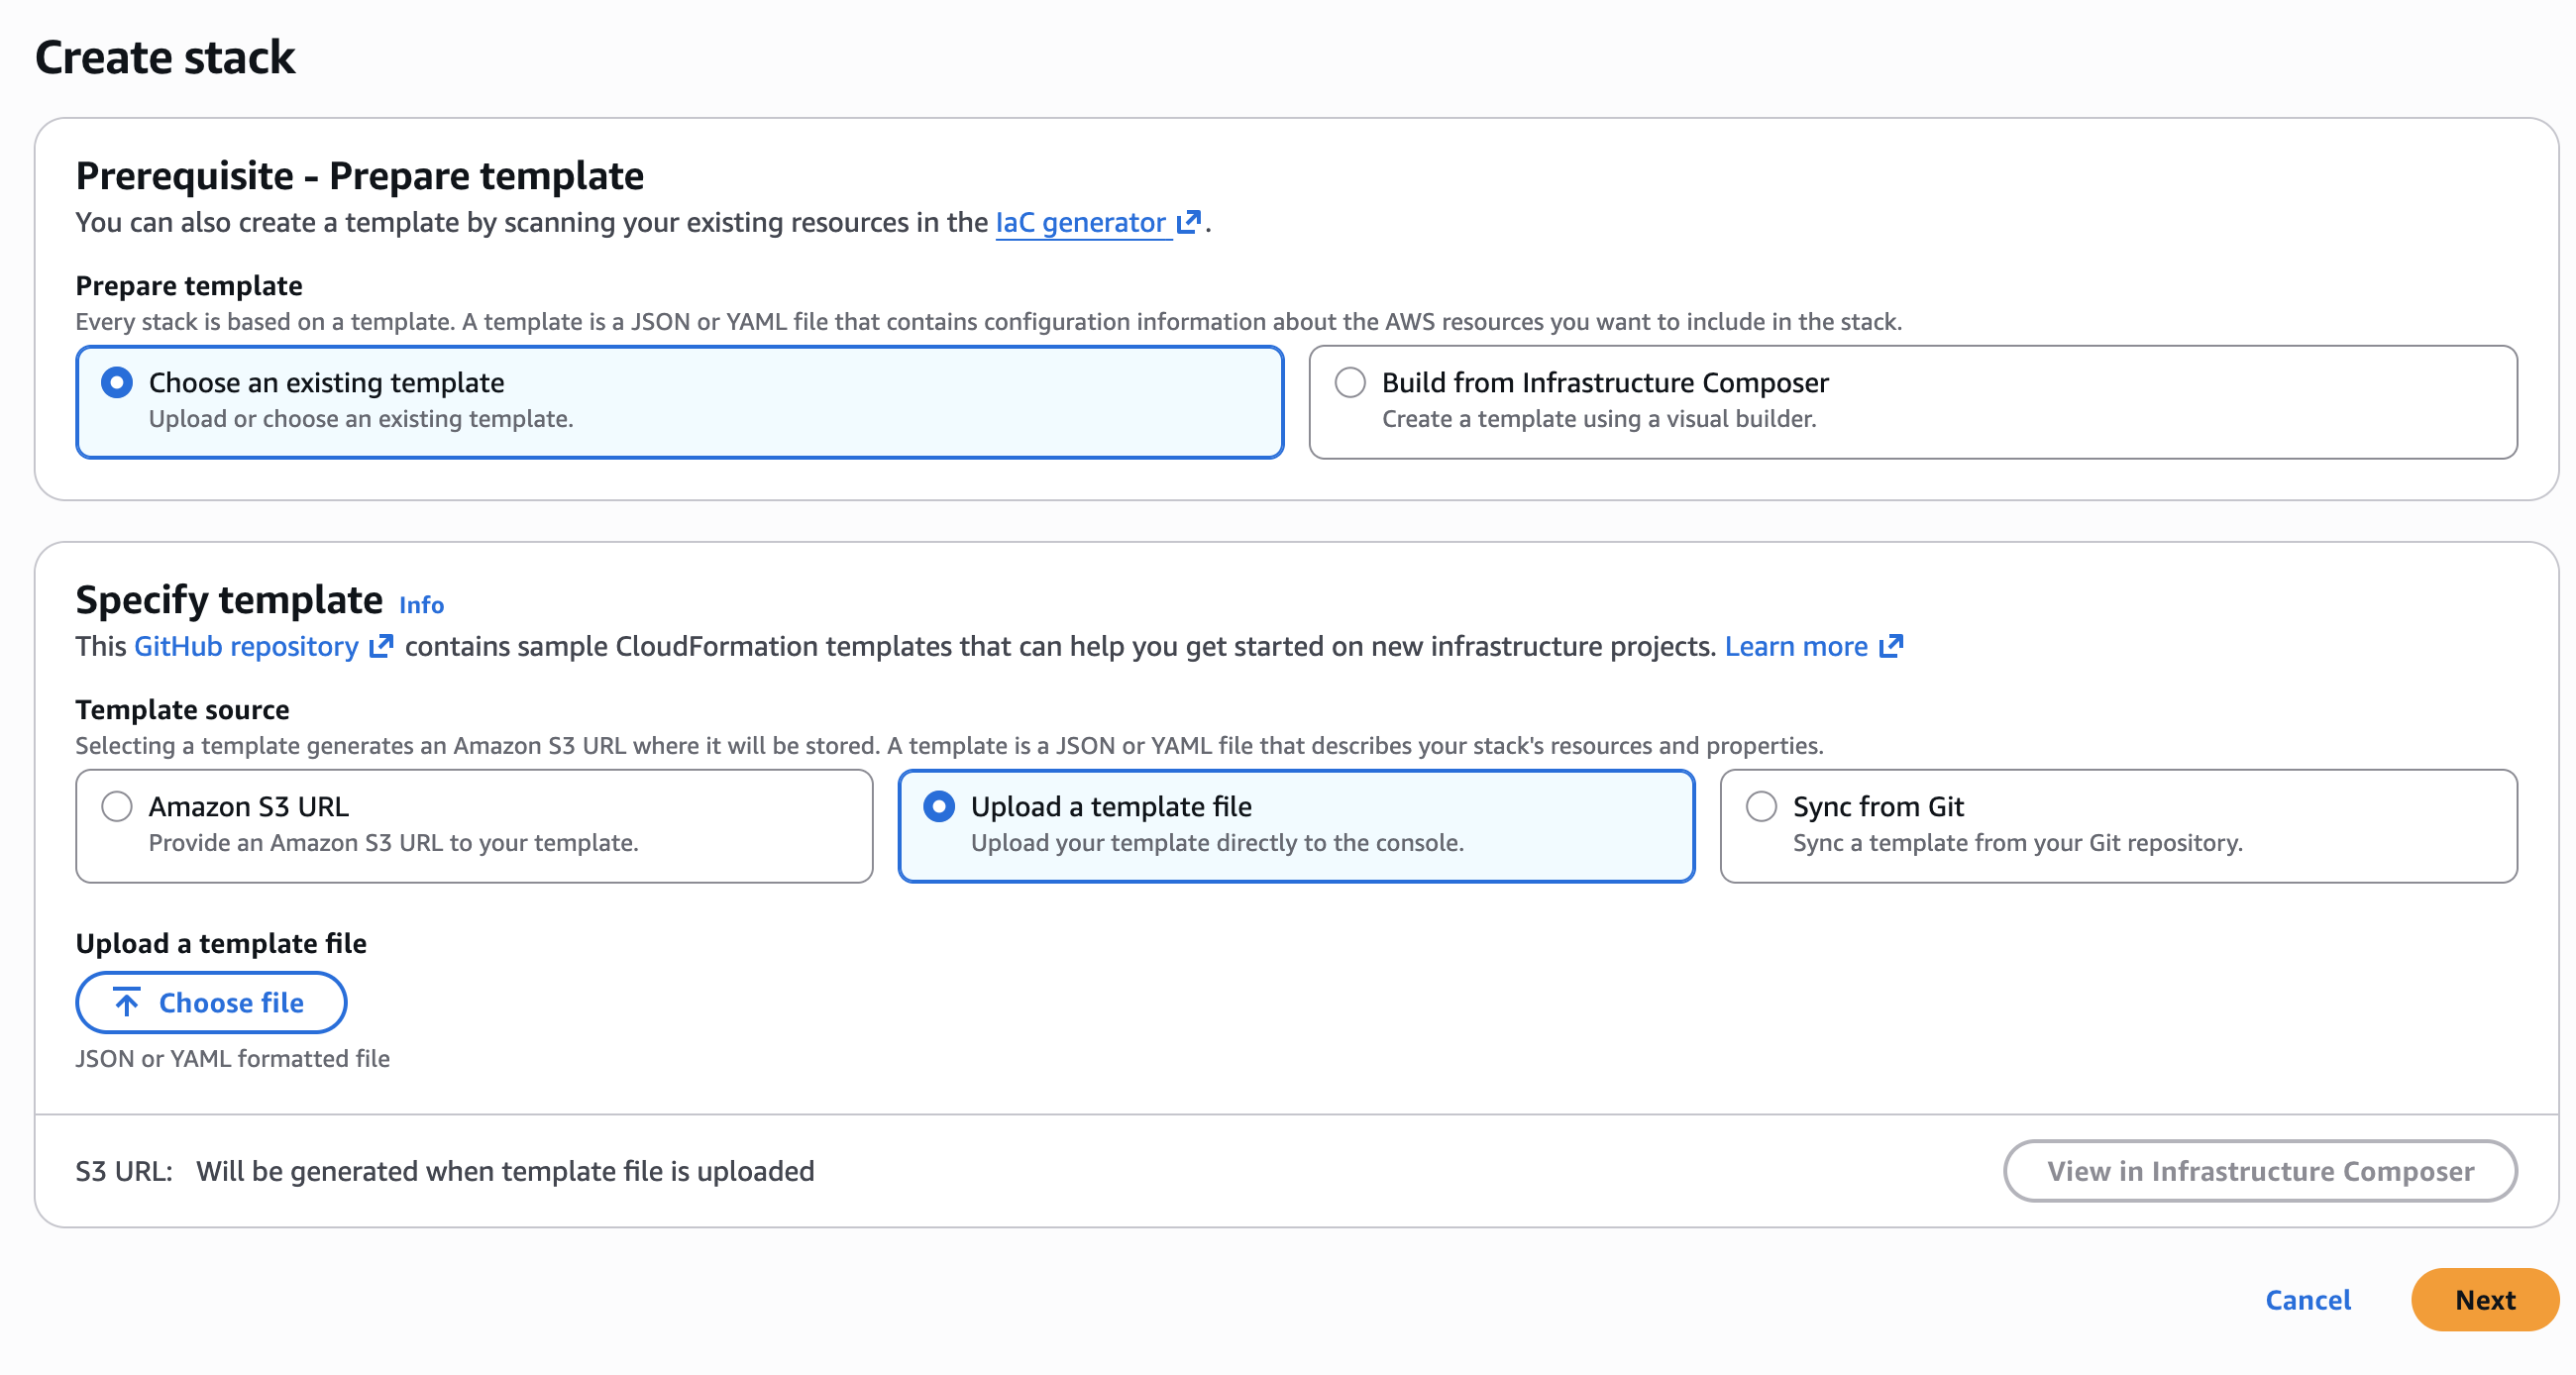
Step A.2: Create AWS CloudFormation Stack
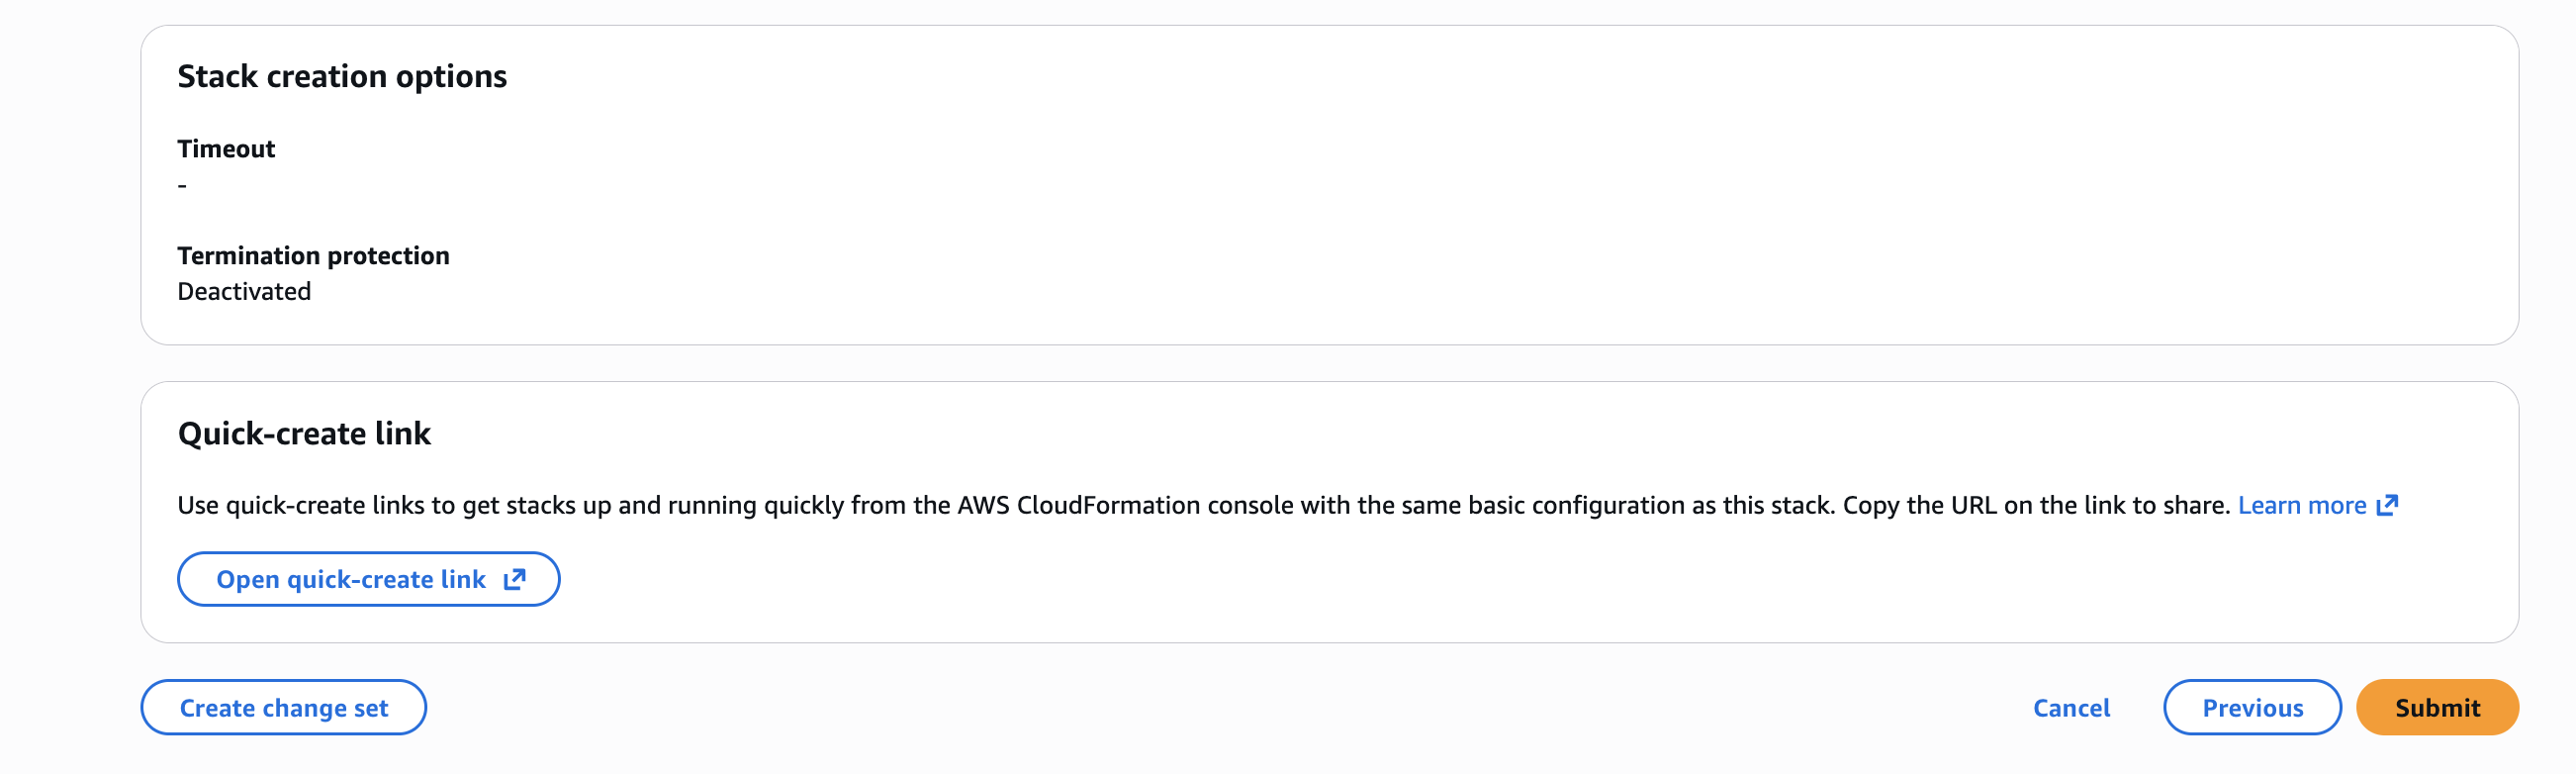
Why create the stack in the AWS Console: CloudFormation creates the IAM role and policies in your account. Creating the stack yourself in the Console lets you control when and where it runs, review each step, and satisfy change-management or compliance requirements.
-
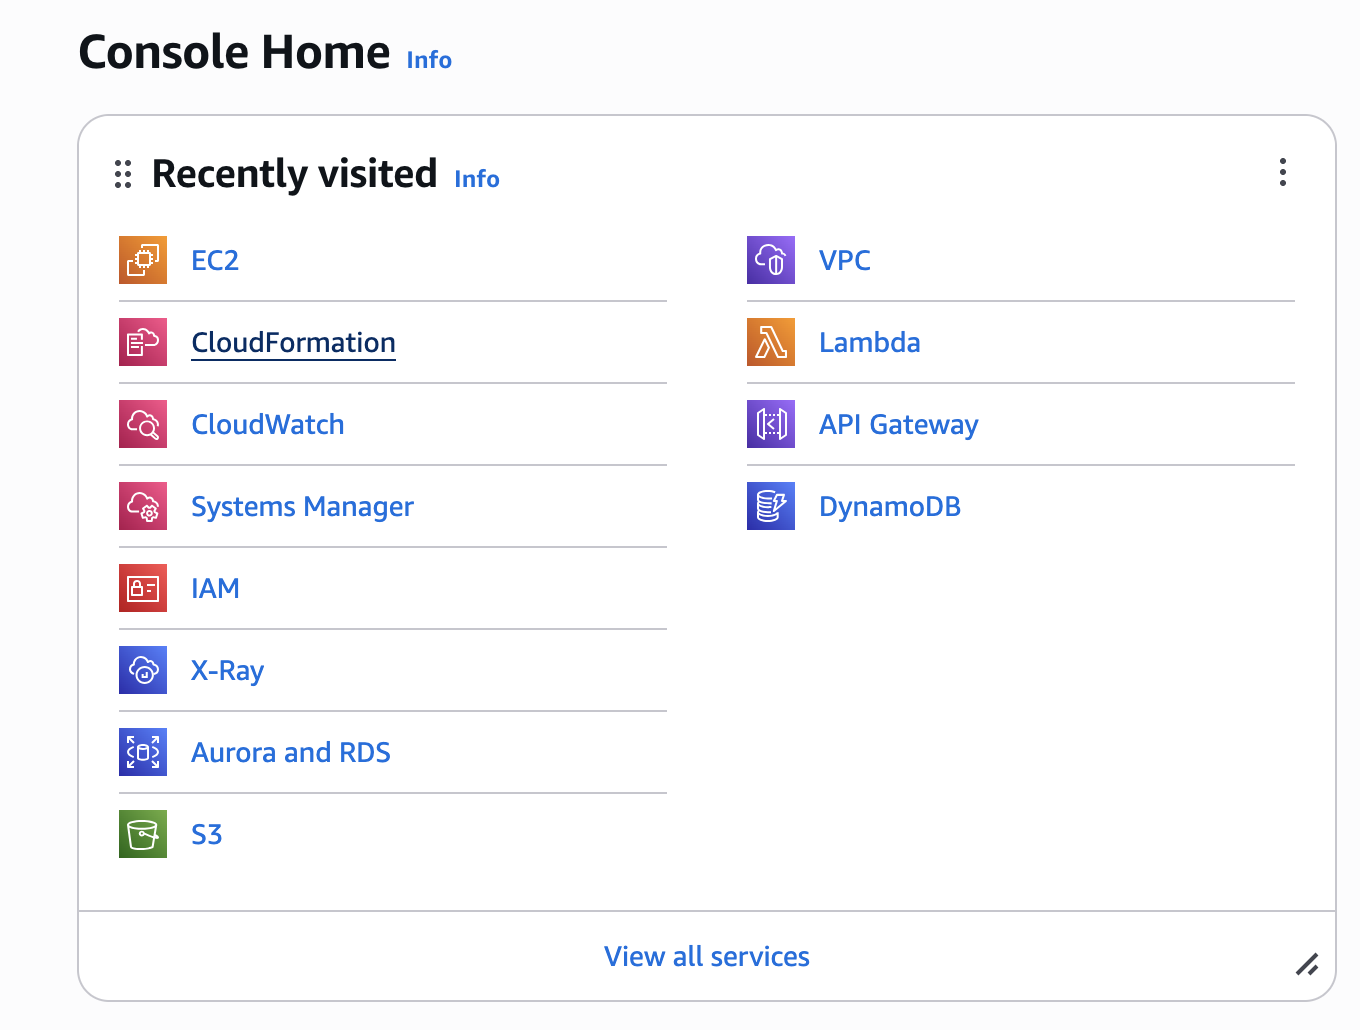
In the AWS Console, search for and open CloudFormation.
-
Click Create stack, then select With new resources (standard).

-
Upload the template file.
-
Under Prepare template, select Choose an existing template.
-
Under Specify template, select Upload a template file.
-
Click Choose file and select the YAML file you saved in Step A.1.
-
Click Next.
-
-
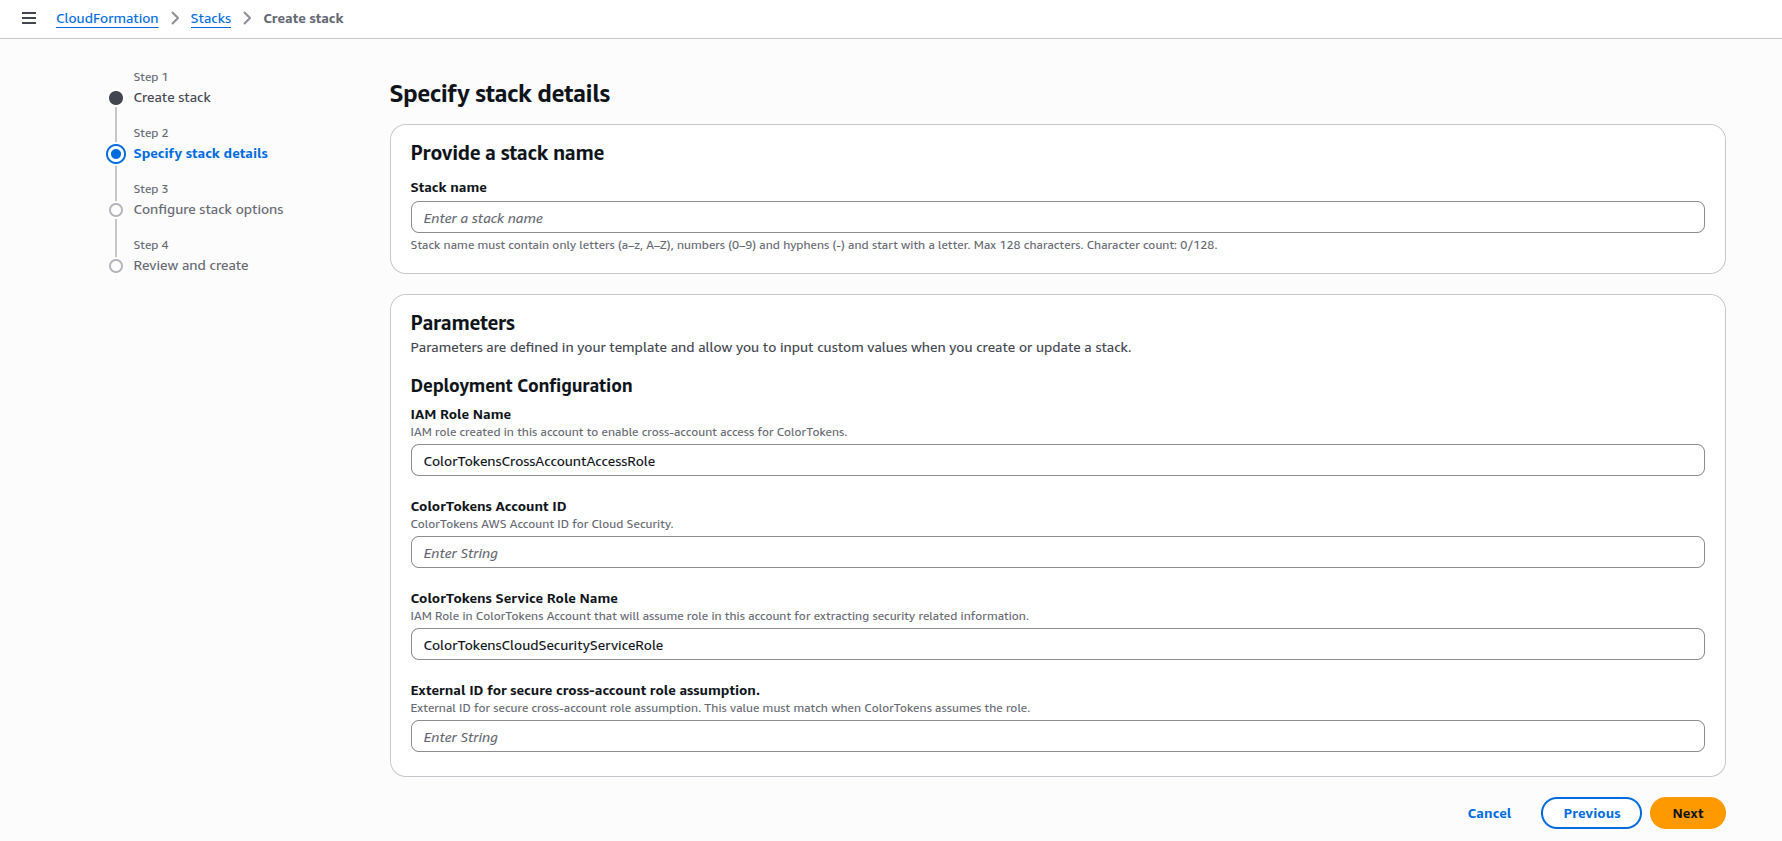
Specify stack name and parameters.
-
For Stack name, enter a name of your choice. The name must follow AWS CloudFormation stack naming rules: only alphanumeric characters and hyphens, starting with a letter, and no longer than 128 characters (e.g.
ColorTokens-CloudSecurity-Stack). -
In Parameters, enter the values prompted by the template:
-
IAM Role Name:
ColorTokensCrossAccountAccessRole(or any name of your choice which contains 'colortokens' string) -
ColorTokens Account ID: use the Xshield AWS Account ID from the Prerequisites table for your region. If ColorTokens has provisioned a dedicated cloud environment for your organization, contact your account representative for the correct account ID.
-
ColorTokens Service Role Name:
ColorTokensCloudSecurityServiceRole(keep the default unless instructed otherwise) -
External ID for secure cross-account role assumption: paste a unique ID (e.g.
iudklj-2ndr5j3-sdjkljl5)
-
-
Click Next.
-
-
Configure stack options.
-
(Optional) Add tags.
-
Check the box acknowledging that CloudFormation will create IAM resources.
-
Click Next.
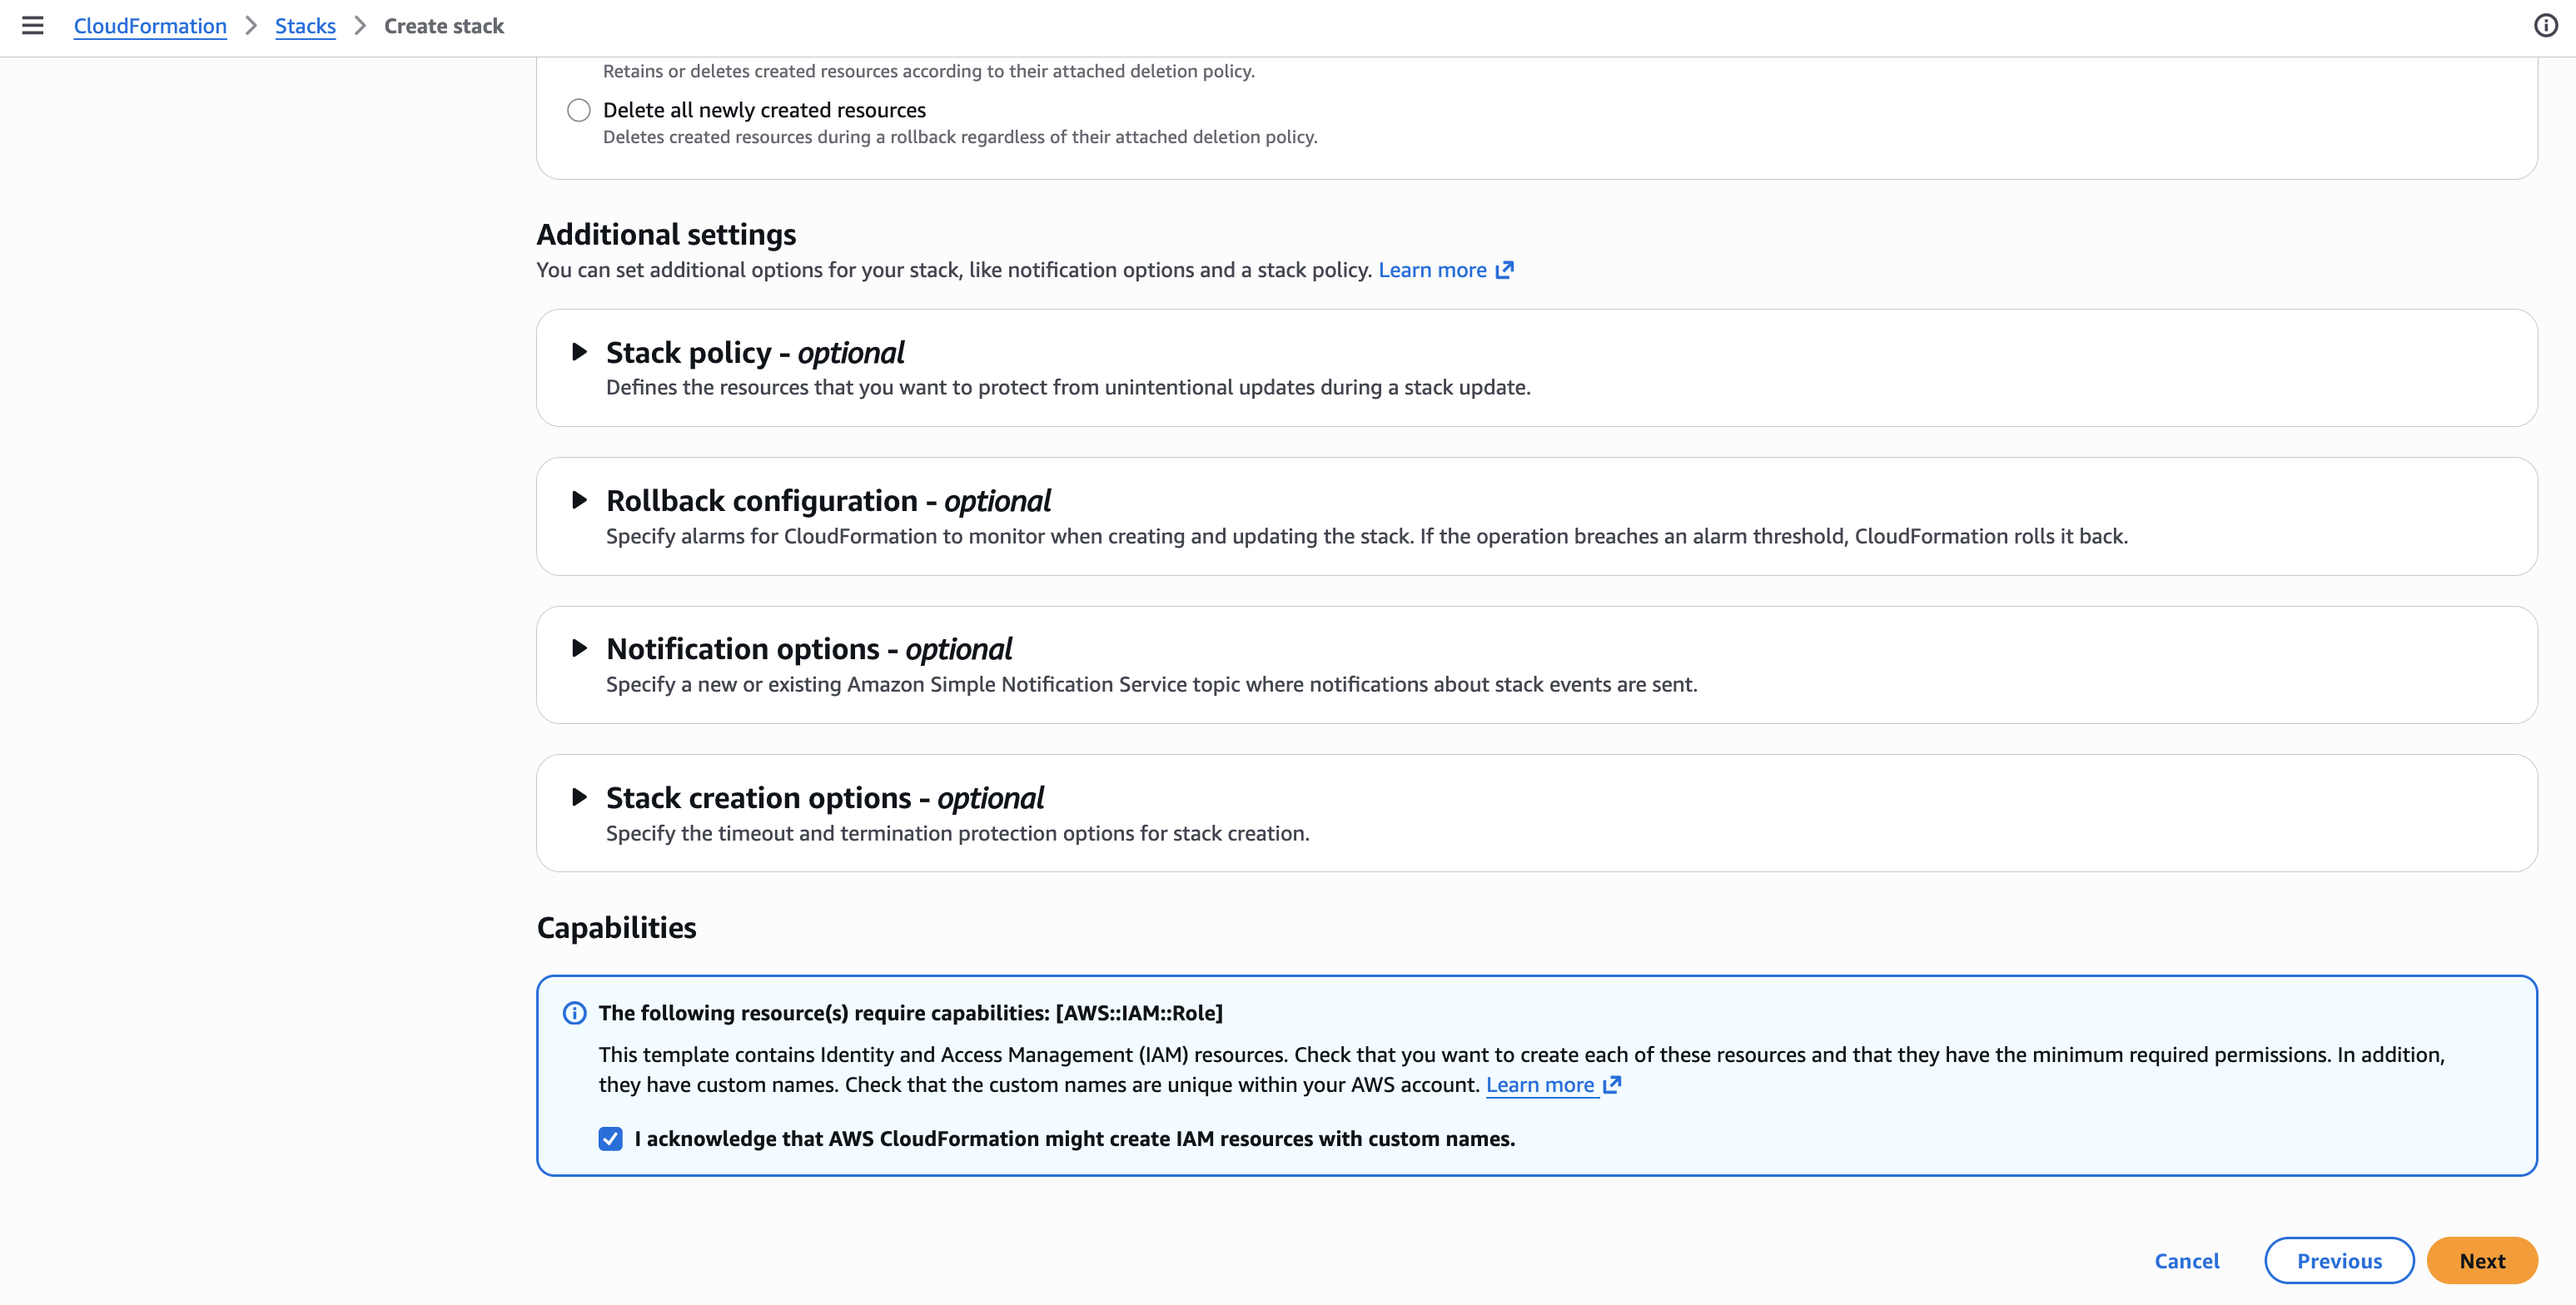
-
-
Review the stack details, then click Submit.
After the stack is created successfully, go to Step 3: Enter Account Details.
Path B: Create the IAM role and permissions manually
Use this path when you want to skip the CloudFormation template and create the cross-account IAM role and policies yourself in the AWS Console. The role and permissions must match what Xshield expects so that verification and connection in the portal succeed.
Overview: What happens with Path B (no CloudFormation)
With Path B there is no CloudFormation stack in your account:
Step B.1: Create the cross-account IAM role
-
In the AWS Console, go to IAM → Roles → Create role.
-
For Trusted entity type, choose Custom trust policy.
-
In Custom trust policy, paste the following. This allows only the ColorTokens AWS account to assume the role (same as in the CloudFormation template):
{
  "Version": "2012-10-17",
  "Statement": [
    {
      "Effect": "Allow",
      "Principal": {
        "AWS": "arn:aws:iam::<ColorTokens Account ID>:role/ColorTokensCloudSecurityServiceRole"
      },
      "Action": "sts:AssumeRole",
      "Condition": {
        "StringEquals": {
          "sts:ExternalId": "<External ID>"
        }
      }
    }
  ]
}
Replace
<ColorTokens Account ID>with the Xshield AWS Account ID from the Prerequisites table for your region. If ColorTokens has provisioned a dedicated cloud environment for your organization, contact your account representative for the correct account ID. -
Click Next.
-
Do not attach any policies yet; click Next again, then set the Role name to
ColorTokensCrossAccountAccessRole(or any name of your choice which contains 'colortokens' string). Click Create role.
Xshield assumes this role from the ColorTokens AWS account (arn:aws:iam::<ColorTokens Account ID>:role/ColorTokensCloudSecurityServiceRole). Use the account ID from the Prerequisites table for your region. The role name is used by Xshield to find and assume the role when you Verify and Connect; use the name above or a custom role name which contains 'colortokens' string or contact support.
Step B.2: Attach the required permissions policy
-
Open the role you created in Step B.1 (ColorTokensCrossAccountAccessRole).
-
On the Permissions tab, click Add permissions → Create inline policy.
-
Open the JSON tab and replace the default policy with the permissions Xshield needs for discovery, monitoring and cloud compliance scans. The policy below matches the CloudFormation template (read-only access to S3, Lambda, DynamoDB, EC2, RDS, ELB, API Gateway, X-Ray, etc). Copy and paste it, then click Next.
To allow Xshield to read your VPC Flow Logs bucket for network traffic visibility, see VPC Flow Logs.
noteThe policy template below includes a superset of all permissions, covering both Cloud Segmentation and XCloud compliance. For a detailed breakdown of individual permissions and their categories (Mandatory and For Upcoming Feature), refer to the Deployment Guide IAM permissions section.
{
  "Version": "2012-10-17",
  "Statement": [
    {
      "Action": [
        "s3:ListAllMyBuckets",
        "s3:GetBucketLocation",
        "s3:GetBucketAcl",
        "s3:GetBucketPolicy",
        "s3:GetBucketVersioning",
        "s3:GetBucketPublicAccessBlock",
        "s3:GetBucketNotification",
        "s3:GetBucketTagging",
        "s3:ListBucket"
      ],
      "Resource": "*",
      "Effect": "Allow",
      "Sid": "ColorTokensS3MetadataReadAccess"
    },
    {
      "Action": [
        "lambda:ListFunctions",
        "lambda:GetFunction",
        "lambda:GetFunctionConfiguration",
        "lambda:GetPolicy",
        "lambda:ListTags",
        "lambda:ListEventSourceMappings"
      ],
      "Resource": "*",
      "Effect": "Allow",
      "Sid": "ColorTokensLambdaReadAccess"
    },
    {
      "Action": [
        "dynamodb:ListTables",
        "dynamodb:DescribeTable",
        "dynamodb:ListTagsOfResource"
      ],
      "Resource": "*",
      "Effect": "Allow",
      "Sid": "ColorTokensDynamoReadAccess"
    },
    {
      "Action": [
        "ec2:Describe*",
        "elasticloadbalancing:Describe*",
        "rds:Describe*"
      ],
      "Resource": "*",
      "Effect": "Allow",
      "Sid": "ColorTokensCommonReadAccess"
    },
    {
      "Action": [
        "rds:List*"
      ],
      "Resource": "*",
      "Effect": "Allow",
      "Sid": "ColorTokensRDSReadAccess"
    },
    {
      "Action": [
        "apigateway:GET"
      ],
      "Effect": "Allow",
      "Resource": "*",
      "Sid": "ColorTokensAPIGatewayReadAccess"
    },
    {
      "Action": [
        "ec2:GetManagedPrefixListEntries"
      ],
      "Effect": "Allow",
      "Resource": "*",
      "Sid": "ColorTokensPrefixListReadAccess"
    },
    {
      "Action": [
        "ec2:SearchTransitGatewayMulticastGroups"
      ],
      "Effect": "Allow",
      "Resource": "*",
      "Sid": "ColorTokensReadTransitGatewayGroup"
    },
    {
      "Action": [
        "directconnect:Describe*"
      ],
      "Effect": "Allow",
      "Resource": "*",
      "Sid": "ColorTokensDirectConnectReadAccess"
    },
    {
      "Action": [
        "networkmanager:ListCoreNetworks",
        "networkmanager:GetCoreNetwork",
        "networkmanager:ListAttachments",
        "networkmanager:GetVpcAttachment",
        "networkmanager:GetSiteToSiteVpnAttachment",
        "networkmanager:GetConnectAttachment",
        "networkmanager:GetTransitGatewayRouteTableAttachment",
        "networkmanager:ListPeerings",
        "networkmanager:GetTransitGatewayPeering",
        "networkmanager:GetTransitGatewayRegistrations"
      ],
      "Effect": "Allow",
      "Resource": "*",
      "Sid": "ColorTokensNetworkManagerReadAccess"
    },
    {
      "Action": [
        "xray:GetTraceSummaries",
        "xray:BatchGetTraces"
      ],
      "Effect": "Allow",
      "Resource": "*",
      "Sid": "ColorTokensXRayReadAccess"
    },
    {
      "Action": [
        "access-analyzer:ListAnalyzers"
      ],
      "Effect": "Allow",
      "Resource": "*",
      "Sid": "XcloudAccessAnalyzerReadAccess"
    },
    {
      "Action": [
        "cloudtrail:DescribeTrails",
        "cloudtrail:GetTrailStatus",
        "cloudtrail:GetEventSelectors"
      ],
      "Effect": "Allow",
      "Resource": "*",
      "Sid": "XcloudCloudTrailReadAccess"
    },
    {
      "Action": [
        "cloudwatch:DescribeAlarms"
      ],
      "Effect": "Allow",
      "Resource": "*",
      "Sid": "XcloudCloudWatchReadAccess"
    },
    {
      "Action": [
        "config:DescribeConfigurationRecorderStatus",
        "config:DescribeConfigurationRecorders"
      ],
      "Effect": "Allow",
      "Resource": "*",
      "Sid": "XcloudConfigReadAccess"
    },
    {
      "Action": [
        "ec2:DescribeInstances",
        "ec2:DescribeSnapshots",
        "ec2:DescribeAddresses",
        "ec2:DescribeFlowLogs",
        "ec2:DescribeRegions",
        "ec2:DescribeSecurityGroups",
        "ec2:DescribeNetworkAcls",
        "ec2:DescribeNetworkInterfaces",
        "ec2:DescribeVpcs"
      ],
      "Effect": "Allow",
      "Resource": "*",
      "Sid": "XcloudEC2ReadAccess"
    },
    {
      "Action": [
        "elasticloadbalancing:DescribeLoadBalancers",
        "elasticloadbalancing:DescribeListeners",
        "elasticloadbalancing:DescribeRules"
      ],
      "Effect": "Allow",
      "Resource": "*",
      "Sid": "XcloudELBReadAccess"
    },
    {
      "Action": [
        "iam:GetAccountSummary",
        "iam:GetCredentialReport",
        "iam:GetPolicyVersion",
        "iam:GetAccountPasswordPolicy",
        "iam:GenerateCredentialReport",
        "iam:ListAttachedUserPolicies",
        "iam:ListEntitiesForPolicy",
        "iam:ListPolicies",
        "iam:ListServerCertificates",
        "iam:ListUsers",
        "iam:ListUserPolicies",
        "iam:ListVirtualMFADevices"
      ],
      "Effect": "Allow",
      "Resource": "*",
      "Sid": "XcloudIAMReadAccess"
    },
    {
      "Action": [
        "kms:DescribeKey",
        "kms:GetKeyRotationStatus",
        "kms:ListKeys"
      ],
      "Effect": "Allow",
      "Resource": "*",
      "Sid": "XcloudKMSReadAccess"
    },
    {
      "Action": [
        "logs:DescribeMetricFilters"
      ],
      "Effect": "Allow",
      "Resource": "*",
      "Sid": "XcloudLogsReadAccess"
    },
    {
      "Action": [
        "rds:DescribeDBInstances"
      ],
      "Effect": "Allow",
      "Resource": "*",
      "Sid": "XcloudRDSReadAccess"
    },
    {
      "Action": [
        "s3:GetAccountPublicAccessBlock",
        "s3:GetBucketAcl",
        "s3:GetBucketLocation",
        "s3:GetBucketLogging",
        "s3:GetBucketPolicy",
        "s3:GetBucketVersioning",
        "s3:GetEncryptionConfiguration",
        "s3:GetReplicationConfiguration",
        "s3:ListAllMyBuckets",
        "s3:GetBucketPublicAccessBlock"
      ],
      "Effect": "Allow",
      "Resource": "*",
      "Sid": "XcloudS3ReadAccess"
    },
    {
      "Action": [
        "sns:ListSubscriptions"
      ],
      "Effect": "Allow",
      "Resource": "*",
      "Sid": "XcloudSNSReadAccess"
    },
    {
      "Action": [
        "sts:GetCallerIdentity"
      ],
      "Effect": "Allow",
      "Resource": "*",
      "Sid": "XcloudSTSReadAccess"
    },
    {
      "Action": [
        "account:GetAccountInformation"
      ],
      "Effect": "Allow",
      "Resource": "*",
      "Sid": "XcloudAccountReadAccess"
    }
  ]
} -
Name the policy (e.g. ColorTokensAccessPolicy) and click Create policy.
If the CloudFormation template in the Xshield portal (Cloud Connectors → AWS → Manual → View CloudFormation Template) is updated with new actions or services, replicate those changes in your inline policy so discovery, monitoring and cloud compliance scans stay complete.
After the role exists with this trust policy and permissions, go to Step 3: Enter Account Details below. Enter your Account Name, Account ID, IAM Role Name and External ID, then click Verify (Xshield will confirm the role in your account), then click Connect to complete onboarding.
Step 3: Enter Account Details
Why we ask for Account Name, Account ID, IAM Role Name and External ID: Xshield uses the Account ID to identify the AWS account and to verify the connection. For both Path A and Path B, Verify checks whether ColorTokens can assume the cross-account role in that account (role-assumption check). The Account Name is a label you choose for this account in the Xshield portal. Once Verify succeeds, Connect completes the onboarding and starts syncing resources.
-
Configure the account details:
a. Select Account Type as Resource.
b. Enter your Account Name, Account ID, IAM Role Name and External ID.
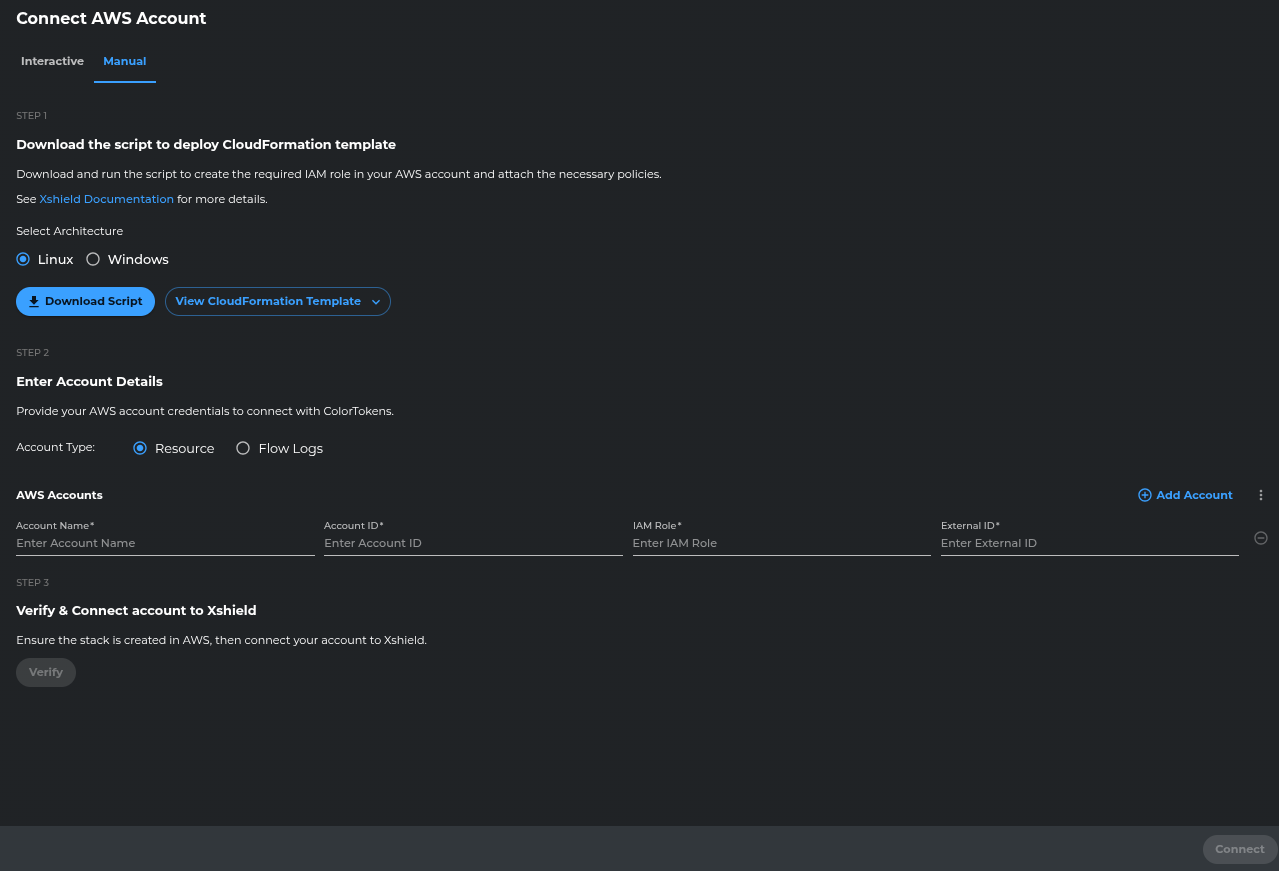
-
Click Verify.
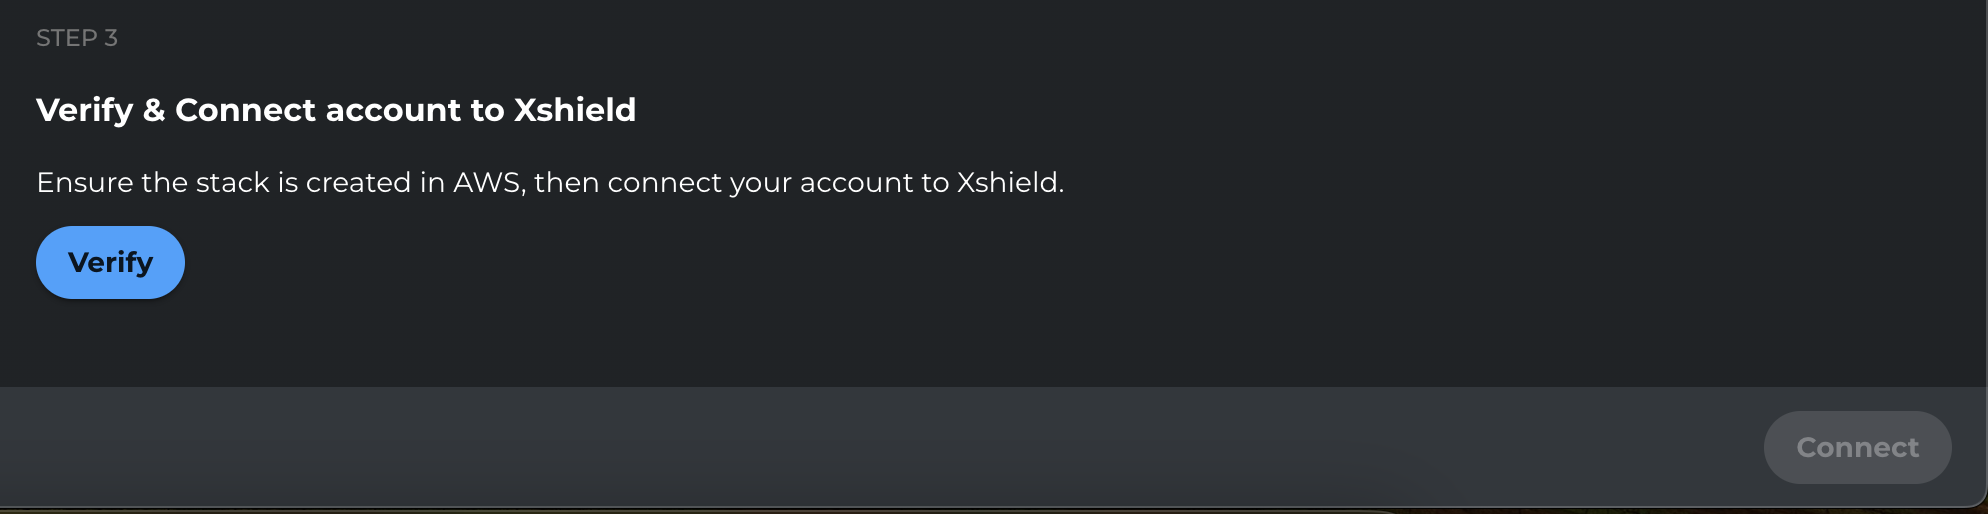
-
After verification completes, click Connect.

Step 4: Confirm Account Connection
Confirm that the AWS account is connected and appears in the Xshield platform. Resources from the account will begin syncing; enable VPC Flow Logs and AWS X-Ray for full visibility as described in the Next Steps below.

Next Steps
After the AWS account is connected, visibility depends on what you enable:
| What you get | When it's available |
|---|---|
| Resource discovery (EC2, RDS, Lambda, etc.) | Right after Connect — resources begin syncing. |
| Network traffic analysis | After you enable VPC Flow Logs and grant Xshield access to the flow logs bucket. See VPC Flow Logs. |
| Application trace visibility | After Connect when AWS X-Ray is enabled and accessible. See X-Ray Traces. |
| Cloud compliance | After Connect — available in Compliance Reports menu. |